Curating Lichens
Here we provide some general recommendations on best practices for curating specimens of lichenized fungi, i.e., processing these specimens to be archived in a collection.
Before learning how to curate the material, it might help to understand about collecting lichens. Please review the recommendations how to collect specimens.
_______________________________________________________________________________________
Table of Contents
- Summary
- Sorting Specimen
- Prepare Specimens & Curation Material
- Mounting or not Mounting
- Rock & Bark
- Soil Crusts
- Large Specimens (oversize & not adhered)
- Herbarium Packets
- Storage
- Keeping Track of Specimens
- Curation Materials & Supplies
_______________________________________________________________________________________
A brief summary …
Lichens grow on a variety of substrates, including soil, rocks and trees. According to their substrate and growth form the preservation of specimens requires different strategies.
Specimens on rock & bark, especially crustose and closely adhering foliose ones, are typically collected with their substrate. In fact crustose lichens and tightly adhering foliose species typically cannot be removed from their substrate without damage. In the herbarium the substrate provide supports and prevents specimens from disintegrating.
Soil crusts tend to be extremely fragile and are therefore the most difficult to preserve. These specimens should be collected with sufficient substrate to avoid material crumbling apart already during collection. Excess soil can later be trimmed off and and it is generally recommended to infuse the soil with diluted white glue to stabilize the specimens for long-term preservation.
Specimens collected with their substrate should be mounted to cardboard. This avoids specimens to move and get damaged in their packet [especially if several rock specimens are placed into the same packet]. The cardboard should be labeled with a unique identifier [“collector name+collector number” and/or catalog number (= barcode)]. If specimens are mounted on clearly labeled cardboard prevents these specimens to from accidentally being placed into the wrong packet. It is also easier to annotate specimens mounted to cardboard, especially if several crusts on the same substrate cannot physically be separated and are thus placed into the same packet.
Larger, foliose and fruticose lichens are often more easily collected without their substrate. These specimens must never be glued to the cardboard.
Never glue the thalli of lichen specimens itself directly onto cardboard.
Unlike soil crusts, fruticose specimens on the ground are typically not closely adhered to their substrate (e.g., reindeer lichens, Icelandic Moss, etc.). They are typically also collected without their substrate. Particularly when dry, these specimens tend to be fragile. It is then recommended to wet and press them already in the field, although making sure the material is quickly dried to avoid mold (use a plant press, or wrap the moistened and thus flexible material tightly into tissue).
Like large foliose specimens and flattened fruticose specimens can then be placed into herbarium packets without the need for further curation. A piece of cardboard is typically still placed behind the specimen to stabilize the packet.
However, placing a piece of cardboard into a packet with a loose foliose of fruticose thalli may macerate specimens, when the cardboard and/or the specimen in the packet move. It may be recommended therefore to add an additional, second envelope mounted to the cardboard into the main packet. To preserve small, fragile fragments of specimens glassine seed envelopes mounted to cardboard are also useful.
Now let’s look at these steps in more detail…
_______________________________________________________________________________________
Sorting specimens
After a field trip, back in the herbarium, first sort your collection bags according to date and locality acronym (= collecting site), then by the micro-habitat.
To recapitulate briefly:
To avoid mold, specimens must be dry. Therefore, collect and store specimens only in paper bags.
It is recommended to place only specimens from the same micro-habitat into one bag, adding a micro-habitat slip. To avoid mixing up collection bags from several trips, write date and a locality acronym onto each bag. The locality acronym then corresponds to your main collection sites in a field notebook.
The rule here: one paper bag = one micro-habitat
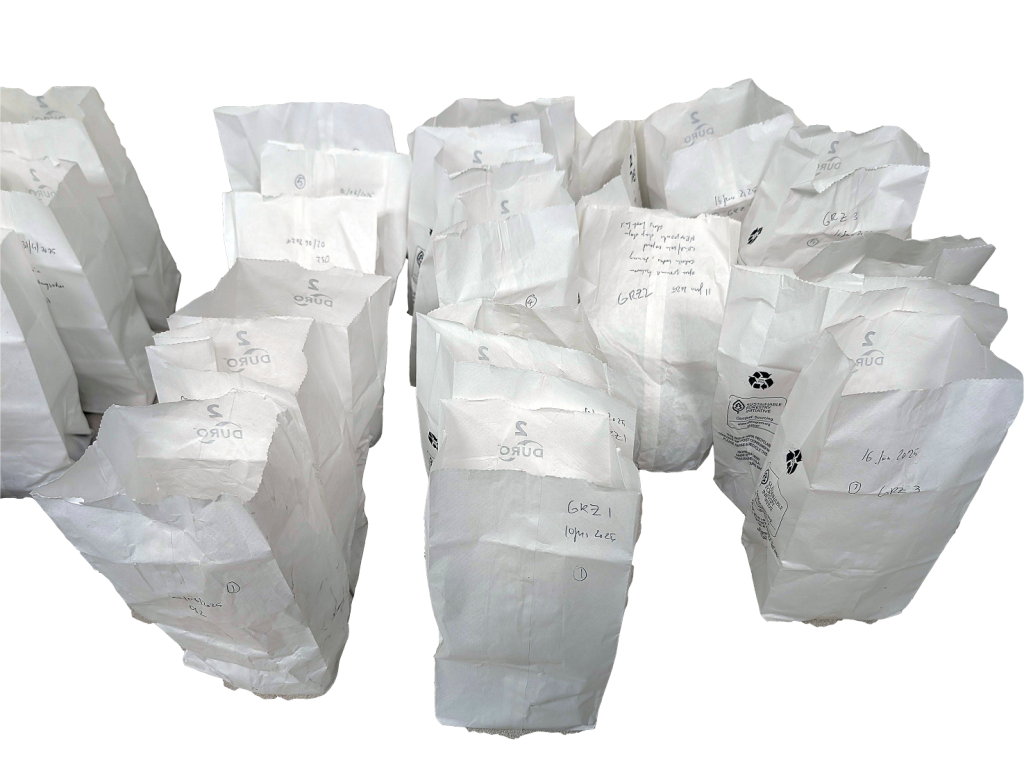
Collection bags: sorted by Location ID and Date.
Some collectors prefer not placing different species in the same bag. In practice this may be difficult. Especially on rock it is often physically impossible to strictly separate specimens by species. But even if you prefer to keep each species separate, it is not recommended to assign collector numbers already in the field. Use locality numbers instead. Lichens are not easily distinguished and it is best to sort specimens for curation under a dissecting scope in the lab.
_______________________________________________________________________________________
Prepare Specimens & Curation Materials
Curation and data entry of the material should be done before specimens are identified. As part of the process, specimens get organized and assigned unique identifiers. Once specimens that are fully curated and the records have been entered into the database, they are more easily handled than the “raw” collection material.
The procedure…
- Label and number mounting cards with “your name” and a “sequential collector’s number”, e.g., “Bungartz 7682”.
- Spread out these cards onto which you will mount your specimens.
- Take one collection bag at a time, remove the habitat-slip and your specimen(s) from that bag. To sort the specimens empty only one bag at a time.
- Review the specimens from the bag under the microscope. Sort the ones that appear to be the same species (specimens that look the same) and place these on the numbered cards.
- Try to separate your material – as a rule of thumb you should try to place each different species on a separate card. The idea is that the combination of “collector name+collector number” uniquely identifies not only a specimen, but also a single species.
[In practice this may be difficult. When removing a piece of bark or rock with some lichens attached, it is frequently not possible to physically separate different species growing on that same piece of substrate. In this case, it is generally assumed that the collector number refers to the largest, most conspicuous species. But sometimes you may want to identify several species from the same specimen which cannot physically be separated. This is also the case when dealing with lichenicolous fungi, i.e., where you may want to document a parasitic fungus growing on its host lichen. In these scenarios it is useful, if specimens are mounted to cardboard. On the cardboard individual species on the same substrate can be clearly labeled by adding A, B, C, etc. to the collector number, adding arrows to indicate which letters corresponds to a particular species.] - To document which microhabitat specimens were collected from, write the range of the collector numbers from the cards onto the habitat-slip, so you can later recall which specimens were collected at which particular habitat; e.g., microhabitat-slip #1 refers to specimens #7682-7691, microhabitat-slip #2 refers to specimens #7692-7698, etc. The habitat slip with its rage of numbers and thus the specimens it refers to, should then be placed into the first one of the packets. This sorting of the specimens according to location and then habitat allows for more efficient collection data entry: specimens from the same site and same microhabitat can thus be entered in batch.
- Next: mounting the specimens …
Temporary Packets
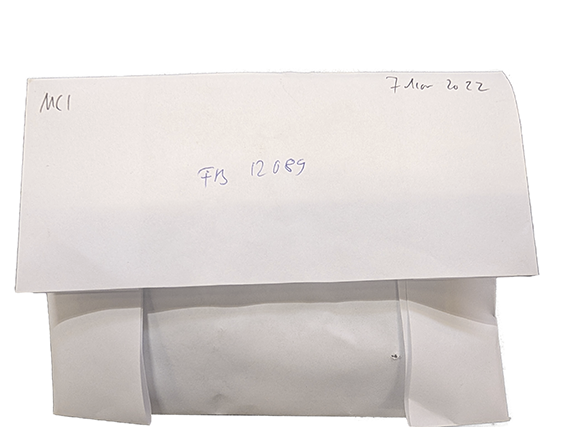
A temporary packet with Location ID (MC1), date, collector name (FB = Frank Bungartz), and collector number (12098).
After curation and data entry specimens may be stored in temporary packets until they are identified and get accessioned into the herbarium.
_______________________________________________________________________________________
Mounting or not Mounting Specimens
Never glue the thalli of lichen specimens itself directly onto cardboard.
This causes damage and prevents important characteristics from being studied (e.g., for the identification of a foliose lichen inspecting the lower side is often important).
Some collectors prefer not to mount specimens, but place any material collected loosely into specimen packets. However, for specimens that were collected with their substrate attached, mounting the material to cardboard has several significant advantages:
The purpose of building a specimen collection is to make the material available for study. The purpose of curation aims to protect specimens from damage and avoid specimens being mixed up when taken out of their packet.
Small specimens or specimen fragments more easily get lost if these specimen are not mounted. Mounted specimens will also not move inside their packet and therefore not as easily get damaged as unmounted ones. The cardboard can also be used to attach information relevant to the specimen such as “collector name + collection number” and “catalog number (= barcode)”. This prevents specimens from getting mixed up, when they are removed from the packet for examination. Also, if several species inside a packet are distinguished, these can clearly be marked on the cardboard with corresponding letters (A, B, C, D, etc.). Other information relevant for identification can also be written directly onto that cardboard, indicating for where a spot test has been applied, or which apothecium has been sectioned, where a piece of the thallus was removed for TLC, etc.
Mounting specimens on index cards also has disadvantages. Most cardboard will glow brightly under UV-light and obscure reactions of the specimen. This can be avoided using unbleached mounting cards.
Although cards provide additional support when handling specimens, specimens are mounted in awkward positions may be more difficult to be examined if glued to a card.
Also, specimens not collected with their substrate cannot and must not be glued. Instead, these should be placed into their own envelope mounted to the cardboard. The card acts as packet stiffener and prevents damage to a specimen that, without substrate, tends to be more fragile. Placing specimens into smaller envelopes backed by cardboard has the additional advantage that specimens do not get macerated by movement of that packet stiffener.
_______________________________________________________________________________________
Rock & Bark Specimens
Specimens on rock, bark or wood can be placed directly into a herbarium packet, glued with their substrate onto the mounting cardboard. It is important that the cardboard is rigid enough to support bulky and heavy specimens. Larger pieces of rock glued to flimsy cards defy the purpose of mounting specimens. In the field ideally only specimens that can reasonably be placed into a herbarium packet should preferably be collected. On soil or bark this often doesn’t present a problem, but it takes practice to chisel off suitable pieces of hard wood or even rock. Large pieces of rock can occasionally be trimmed using a stone saw to more easily fit a packet. But if large pieces cannot be trimmed and it was deemed necessary to collect the material, bulkier specimens should be placed into archival boxes rather than regular specimen envelopes (see comments on oversize specimens).
_______________________________________________________________________________________
Soil Crusts
Soil crusts tend to disintegrate easily when handled.When the soil crumbles the adhering lichens also fall apart and one ends up with dust. Characteristic features of the specimens are then lost and the specimen becomes mostly useless – a powder of soil and lichen fragments that typically can no longer be identified.
A procedure to curate these specimens is to infuse the soil with a solution of a water soluble glue, typically white wood glue (see supplies). This diluted glue will impregnate the soil and, when dry, give the lichen a rigid backing. Specimens treated that way can then be glued onto cardboard, thus preserved in a similar way to rock and bark specimens.
Glue must be very carefully administered to the soil to avoid that glue penetrates into the lichen thalli.
Lichens “gummed up” by glue are useless, their anatomy can no longer be examined and results from thin-layer chromatography may be misleading.
Even when the procedure for preserving soil has been successful and the glue has been diligently applied avoiding “gumming up” the specimen, soil crusts nevertheless tend to be fragile. Mounting these specimens to cardboard and placing these specimens also into cardboard boxes instead of envelopes is strongly recommended. Soil specimens must always treated with diluted glue first, before they are mounted on cardboard. Never glue untreated soil directly. It will crumble and you end up with lichen dust and soil glued to cardboard.
There are two ways to do this, both need some practice. It is recommended to experiment a little and first use specimens of common species, which can be discarded if the lichens get “gummed up”. The upside-down newspaper method is generally more efficient treating a larger amount of specimens, but the petri dish method is typically the safer option, because penetration of the diluted glue into the soil can more easily observed:
Procedure #1: upside-down
- Turn specimens upside down and spread them evenly on a newspaper.
- Use a fine misting gun to spray the soil so that the specimens are soaking wet with water (regular, not distilled).
- Wait until the water has penetrated the soil.
- Gently apply diluted glue (1 part glue : 2 parts water) to the backside of the specimen using a coarse paintbrush.
- Repeat dabbing the soil with glue until it has well penetrated the soil but not the lichen.
- You can check if enough glue has been applied by reviewing the edges of the soil getting white. Generally speaking, “less is more”. It is better to carefully dab specimens repeatedly than applying excess glue.
- The specimen itself must never be allowed to “sit” in excess glue, which may run down the sides if the glue is not carefully applied. If that happens remove the specimen immediately and place it onto dry, fresh newspaper or even lightly dab the specimen with paper tissue to remove any excess liquid. When glue has not yet dried, such specimens may still be salvaged by removing excess glue with water. However, once a specimen has dried and the lichen is “gummed up” because too much glue was used, it may be best to discard that material.
- You can check specimens for penetration of the glue by carefully turning them over.
- Place the specimen upside-down onto a fresh piece of newspaper when moderately dry and it no longer sticks.
- Specimens treated with glue must dry overnight before being mounted on cards.
Procedure #2: petri dish
- Turn specimens upside down and spread them evenly on a newspaper.
- Use a fine misting spray gun to spray the soil so that the specimens are soaking wet with water.
- Wait until the water has penetrated all the soil.
- Place the lower part of the wet specimen (i.e., the soil only!) into a petri dish filled with diluted glue; the secret here is to add just barely enough glue into the petri dish so that the soil, but not the lichen is immersed. If in doubt, use less glue, you can always add more.
- The advantage of this method: you can watch the glue seep into the soil (careful, only the soil should be penetrated, the lichen itself must remain free of glue).
- Capillary action will “suck” the glue into the specimen. Take the specimen out as soon as the glue has penetrated the soil; don’t let it sit in the glue.
- Place the specimen upside-down onto a fresh piece of newspaper when moderately dry and it no longer sticks.
- Specimens treated with glue must dry overnight before mounted on cards.
_______________________________________________________________________________________
Large Specimens (oversize & not adhered)
Large Specimen are a challenge for storage. Whenever possible specimens should be trimmed to fit into standard size herbarium packets. Otherwise oversize packets need to be prepared. Particularly large rock specimens can be unwieldy and must be placed into sturdy archival boxes.
Large foliose and fruticose lichens often still fit easily into standard-sized herbarium envelopes, if they are somewhat flattened. Dry specimens would be too brittle to press. Therefore specimens have to be soaked in water first. They can then be pressed in a conventional plant press. A fan blowing air through the press is usually sufficient to dry the specimens in a few hours. If you do not have access to a plant press you can wrap specimen in paper tissue and dry it between books. Change tissue regularly so specimens won’t mold.
Flattened herbarium specimens will resume their original structure when re-wetted. Reindeer lichens commercially soled for decoration (model trees, wreaths, etc.) are typically soaked in glycerine, which assures that specimens remain permanently pliable and do not become brittle when dry. For long-term preservation this cannot be recommended; it is not known how archival specimens these glycerine specimens are. It is also unknown, whether glycerine treatment interferes with the analysis of secondary chemistry and/or DNA extraction.
Very large foliose and fruticose lichens that do not fit standard size envelopes can be placed instead into folders onto regular herbarium sheets generally used for vascular plants. Most herbaria have dedicated cabinets for these oversize collections. One advantage of “flat storage” (see storage) is that these oversize folders can be filed with the regular collection.
_______________________________________________________________________________________
Herbarium Packets
Some general aspects:
- generally not not or store specimens in plastic– specimen in plastic will mold!
- the only exception: for short-term storage fragments for DNA analysis may be placed in sealed plastic bags with silica gel, for long-term storage these samples are best be stored in sealed plastic bags inside a -85°C freezer; adopt a system to make sure these isolates refer back to the regular herbarium specimens from which they were removed.
- for storage of regular specimens use archival paper and archival glue to assure long-term preservation of the material
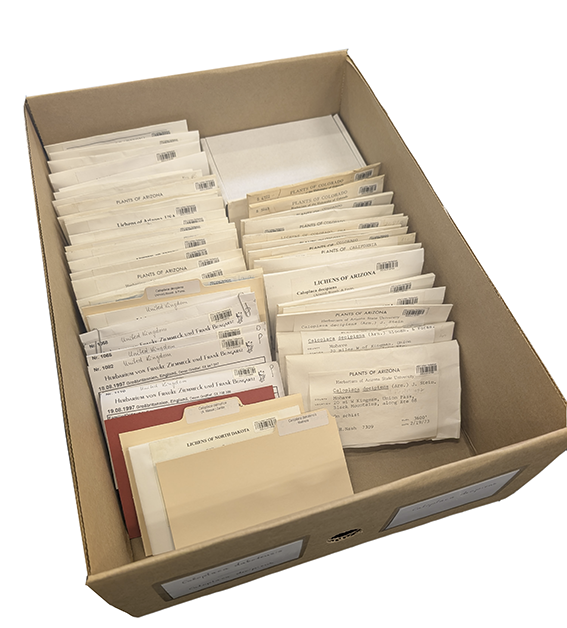
Boxes vs. Envelopes
Lichens are typically stored in standard herbarium “envelopes” folded from regular sized paper (A4 or letter). The advantage of these packages is that by unfolding these “envelopes” specimens can be taken out of their packet without damage. Regular envelopes or paper bags are not ideal, because by sliding specimens in and out repeatedly the specimen surface with its lichen specimen will rub against the paper and, especially brittle specimens may thus break apart.
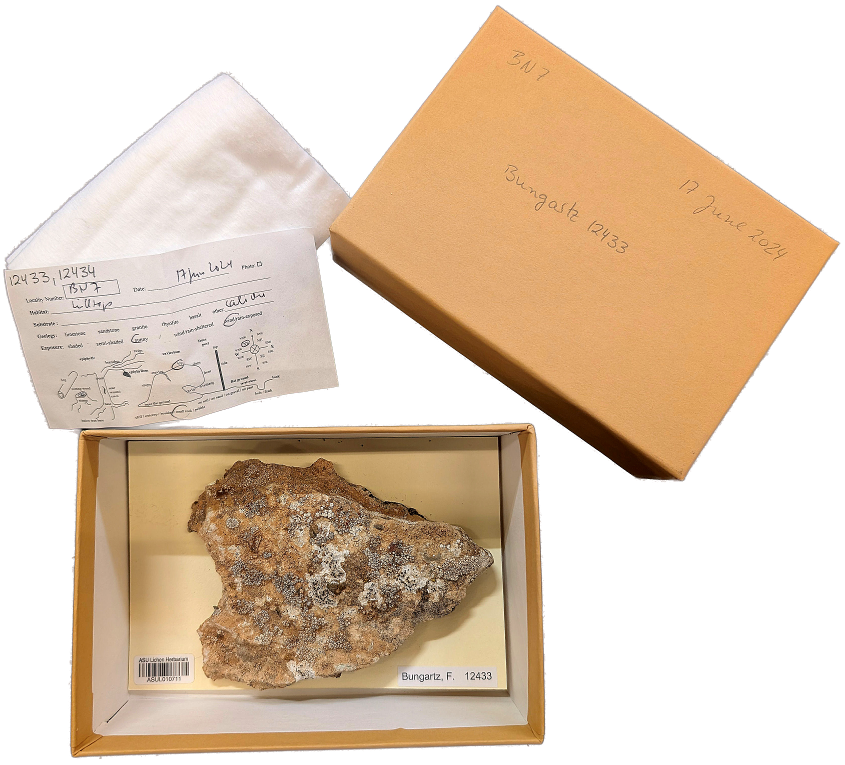
Specimen box: made from archival cardboard; custom made with different heights, the lid of the same size as specimen envelopes so that boxes can be filed as part of the regular, main collection.
Large, bulky rock specimens are better stored in archival carton boxes. Using boxes, ideally with some padding, is also recommended for specimens that may be particularly brittle (e.g., soil crusts). To accommodate bulky specimens of different size use custom made boxes of different depth with a length and width matching that of regular herbarium envelopes. This way these specimen boxes need not to be filed separately from the main collection (see storage).
A classic herbarium envelope: folded from a single sheet of paper with specimens mounted on cardboard.
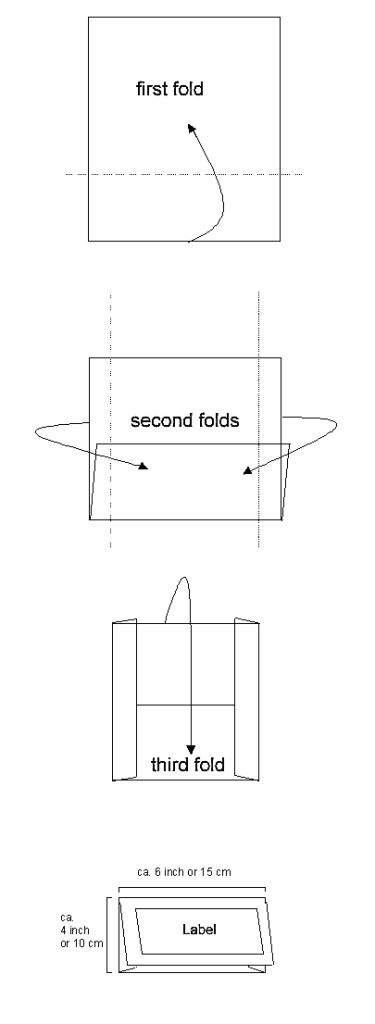
How to fold regular herbarium packets (“envelopes”)…
Most herbaria print specimen labels separately and them glue them onto their packets. To facilitate folding packets, use the mounting cardboard as a folding guide to assure packets have the same dimensions. As an alternative LichenLabler may be used. The software prints labels at the bottom of a sheet with folding marks. That paper sheet can then be folded to show the label on the packet front.
There are two ways to fold a herbarium packet depending on how specimens are stored:
Packets for upright storage (filing cabinets):
This way of folding herbarium packets has the advantage that both front and back of a packet are flat, the “envelopes” can be filed upright in a row like index cards in a filing cabinet, generally taking up less space and envelopes and boxes can be filed together. A disadvantage is that the front flap of these envelope packets opens more easily, specimens possibly falling out, especially if they are heavy.
Here the steps for folding filing packets for upright storage in filing cabinets:
- Fold over the lower half of the paper that the top margin lies in the middle of the upper half.
- Fold the side margins inwards.
- Fold the top of the packet downwards.
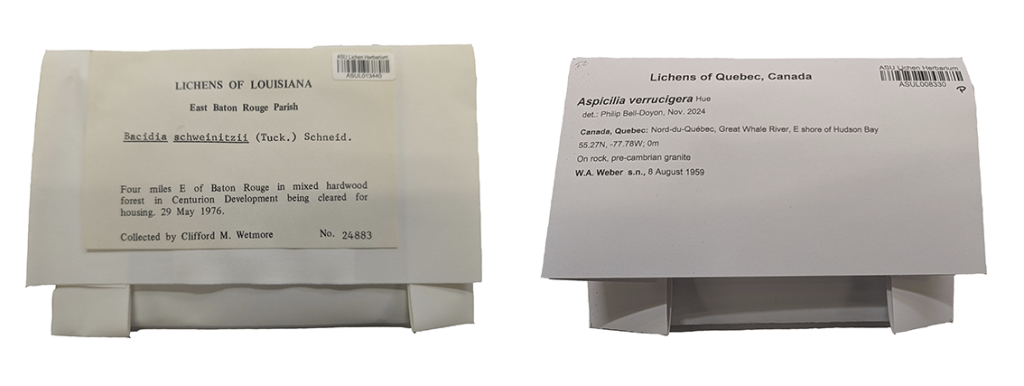
Specimen envelopes for upright storage: the side-flaps folded forward so they don’t interfere with specimens stashed upright, one behind the next.
[On the left a label directly printed on the envelope using LichenLabler, on the right a traditional packet with a classic label glued to envelope front flap; note the barcode sticker.]
Herbarium folder packets (flat storage):
This second way to fold a packet is used for flat storage, filing several envelopes mounted to a regular herbarium size sheet.
Folding packets this way will prevent them from opening easily, because the packet sides flip backwards and especially when mounted to a full size herbarium sheet hold the packet in place. This way specimens are usually less prone to damage than in a filing cabinet. However, specimen handling is inconvenient and flat storage demands more space.
Here the steps for folding packets for flat storage on herbarium folders:
- Fold over the lower half of the paper that the top margin lies in the middle of the upper half.
- Fold the top of the packet downwards.
- Fold the side margins backwards.
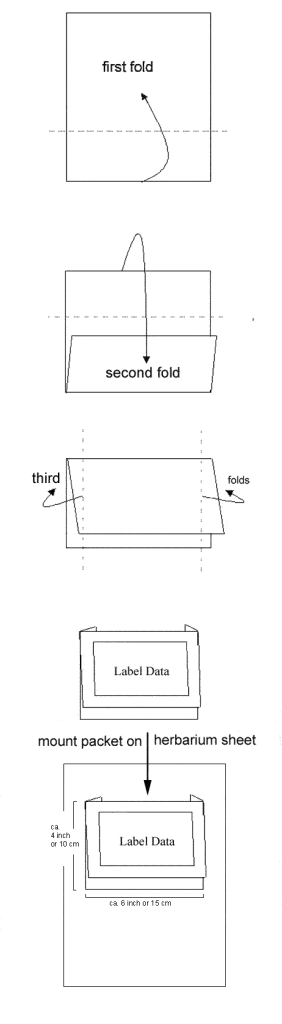
Specimen envelope for flat storage: folded with the side-flaps backwards.
_______________________________________________________________________________________
Storage
Flat vs. Upright
Lichen herbaria generally use two basic storage systems to file specimens: flat vs. upright. Both systems have advantages and disadvantages.
Traditionally the flat filing system is derived from the way vascular plants are stored in a herbarium*.
[*Even though lichens are only “fungi pretending to be plants” at most institutions they are traditionally filed as part of regular herbaria; though the term “fungarium” has been suggested for fungal collections, lichens are symbiotic organisms composed of myco- and photobiont, occupying ecological niches similar to plants; thus the term herbarium does not seem inappropriate].
Lichen specimens are generally much smaller than vascular plants and thus several lichen packets typically fit on a regular size herbarium sheet. Filing packets that way generally means that specimens lie flat, the sheets with these packets stacked on top of one-another. It can be argued that this way of storage is generally more gentle on the specimen. For flat filing, mounting specimens on cardboard is often considered unnecessary and researchers preferring to deal with loose material will generally favor this storage system.
Stored upright, specimens that are not mounted to cardboard are in danger of being macerated from the cardboard stiffeners, heavy specimens may become loose and at the bottom of an upright packet rub against one another. Packets filed upright may also be packed too tightly, damaging fragile specimens.
Mounting a single envelope onto a large herbarium sheet allows room for annotations. This is ideal especially for type specimen, where the protologue can be printed and then be glued to the sheet, next to the packet.
However, flat filing significantly increase the footprint necessary for storage. To save space, collections that use flat filing often mount several packets onto the same regular size herbarium sheet. This system only makes sense if packets on the sheet all belong to the same species. If specimens are subsequently identified to belong to different species, packets need to be removed and reorganized.
Some herbaria therefore do not attach individual packets permanently, but affix them with pins. Reorganizing specimens nevertheless is still more cumbersome than in an upright storage system. Arranging specimens of large collections not only by species, but also according to geography becomes challenging especially in actively growing, diverse collections. Handling loans is impractical also, if researchers request specific specimens from particular geographic regions and not entire sheets.
Regular herbarium sheets holding eight or even ten individual envelopes are unwieldy. Space in the herbarium near a microscope is often limited. To compare specimens more efficiently side-by-side, researchers examining specimens will be tempted to remove the material from their packets to better deal with specimens individually. This increases the risk that specimens become dissociated from their packet, especially if the material is not glued to cardboard with an identifier.
In summary, upright specimen storage thus has several significant advantages:
- it significantly saves storage space
- less curation materials are needed (only packets, no herbarium sheets and folders necessary)
- it facilitates specimen handling; individual specimens can be handled more easily
- this allows for easier reorganization of the material, particularly when IDs change
- individual envelopes are less cumbersome to handle when researchers study the material
- thus minimizing risk of specimens becoming dissociated from their packets
- sending specific specimens on loan rather than entire sheets is less expensive and more efficient
Generally it is being argued that flat filing is more gentle on the specimens. Particularly when dealing with bulky and heavy specimens this is not necessarily correct. Regular herbarium sheets are typically not stiff enough to support several packets with rock specimens.
Most concerns about the risk of upright storage more easily causing specimen damage might be addressed by careful curation of the material, making sure that specimens are mounted on cardboard, the substrate of soil specimens stabilized by glue and specimens cushioned in padding, bulky material stored in boxes rather than envelopes, etc. Overall, if specimens are at greater risk of getting damaged by handling, it is thus necessary to pay more meticulous attention to curation.
Regular specimens filed upright in the main collection of the ASU Lichen Herbarium. Each drawer contains species of one particular genus (or genera), labeled accordingly. Tabbed index cards are used to organize specimens according to species. The color cards then correspond to geographic categories, the continent where specimens were collected (at the ASU Lichen Herbarium: pale blue = North America, green = Central & South America, red = Europe, purple = Africa, yellow = Asia, orange = Antarctica, deep blue = Antarctica).
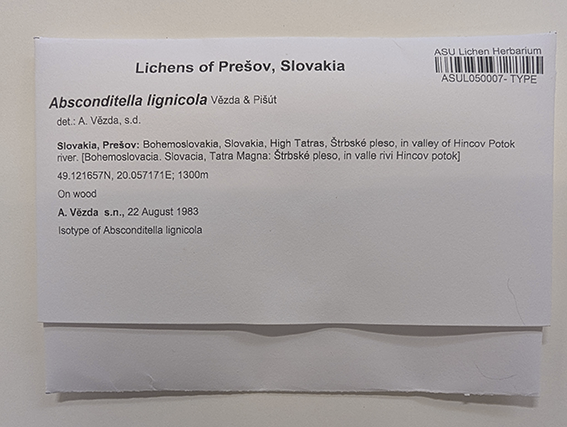
Despite many advantages of upright storage, it is still recommended that particularly valuable specimens are filed separately and stored flat individually in folders on herbarium sheets. As previously emphasized, this storage methods is recommended particularly for times, mounting envelopes together with the protologue onto a regular herbarium sheet.
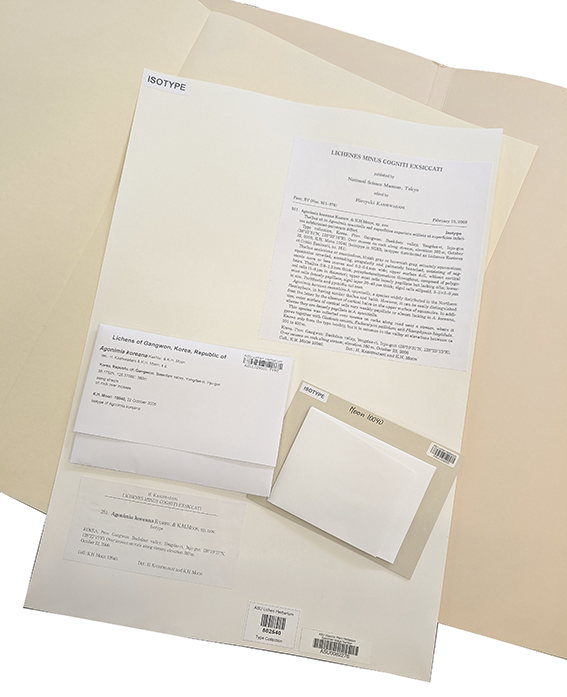
Flat specimen storage of the Isotype specimen of Agonimia koreana in the ASU Lichen Herbarium (for an explanation of the different identifiers, refer to the section below on Keeping track of specimens.
Filing & Cabinets
It is best practice to store specimens in cabinets sorted alphabetically by species identification. A straightforward system, sorting specimens by genus, then species and only then by geography is typically recommended. With the rapid advance of molecular methods, lichen taxonomy keeps changing and it is therefore recommended not to sort specimens by family or higher taxonomic ranks. Also, many species are still being transferred into newly described genera and a conservative approach to taxonomy sorting specimens is often necessary, re-sorting material too frequently is unfeasible.
Unless there is good reason to file specimens separately according to geography, it is generally recommend to sort specimens by species name first and then by geography. Many lichens are widely distributed, although endemism appears to be more common than previously thought. Still, it is inconvenient having to search for the same species in several locations according to their geography.
Separating collections, however, makes sense in some other cases:
Type specimens are important enough to be kept separate. In case of emergency, the types can be evacuated first. For visiting researchers and also when sending material on loan, it is also convenient to have types in one and the same place, more easily accessible, especially if the main collection is large.
Exsiccatae are special collections used by researchers to distribute their expert taxonomic opinion. Like for the types, there is good reason to store these collections separately, as sets, in the sequence the exsiccata was published, not by species identifications. Only thus serve these collections their purpose as a resource for better understanding taxonomic opinion of the authors who originally published the series. Some exsiccatae sets are also quite old and thus have historic value.
Finally, oversize collections are necessarily stored separately. They generally do not fit the main collection. Most specimens, even if bulky, can, however, be filed with the regular collection – boxes for rock specimens of the same width as regular herbarium specimens for example. If the same width these boxes easily fit in between regular specimen envelopes in an upright filing systems. They have to be filed separately, however, in a flat filing system.
_______________________________________________________________________________________
Keeping track of specimens
Unique identifiers are essential when dealing with large collections. They allow to keep track of distinct specimens, which researchers can refer to in their publication by specifically citing the identifiers.
Modern database use globally unique identifiers (GUIDs). These are large alphanumeric numbers that are evry useful to assure that specimen records can efficiently be exchanged between large database systems (e.g., when occurrence records are uploaded and updated from the Consortium to GBIF).
GUIDs are, however, inconvenient when working with specimens in a collection on a daily basis.
Several numbers associated with specimen records may be distinguished. These following terms are Darwin Core conform and used by the Consortium for data entry:
Location ID:
The location ID is not specific to a particular specimen collected in the field, but it can be used to more easily keep track of collections from a particular field size or location visited. As outlined before, it is more efficient to label all bags of lichens collected in the field from the same locality using an acronym. This way locality data is recorded with its location ID only once in a field notebook, and it is not necessary to write detailed locality descriptions onto each individual specimen bag.
Field Number:
If it is necessary to already label specimens directly in the field, a Field Number, corresponding to the actual event of collecting a distinct specimen may be assigned. Each individual collection bag (and thus each microhabitat) might thus be assigned a field number. Researchers working on insects for example typically use field numbers to distinguish different sets of insect traps. Field numbers are not commonly used and typically not necessary when collecting lichens.
Collector Number
Also referred to as collection number or record number, this is the number assigned to a specimen by a collector. It is strongly recommended to use a simple system of consecutive numbers.
Some collectors use combinations of letters and numbers, or they include part of the date. This is not recommended!
For example D-95-5-11/2 could be used as a collector’s number for be the second specimen collected in Germany (D) on the 11th of May 1995. OR 1995/2 would simply be the second specimen collected in the year 1995. These numbers are not informative. They do not mean anything to anyone but to the collector using a particular format. They do not facilitate specimen management, complex numbers are not as easily sorted. The more complex the numbers are, the more easily erroneous numbers get assigned (the wrong date, a duplicate sequence number, etc.). A simple sequence number is informative: it refers to the total of specimens collected, not per year, but overall.
Although this is quite common, collection numbers are best not assigned in the field. Ideally these numbers should be unique not just to each specimen, but to the species collected. Sorting specimens according to species is much easier done in the lab with access to a microscope. It is also more efficient in the field to collect specimen from the same microhabitat together instead of trying to sort species from the same microhabitat into separate bags, each that will need to be labeled.
Collection numbers are unique only referring to specimens in personal, private collections. At any institutional herbarium many different researchers typically work and collect lichens over time. Thus only the combination of collector name+collector number is unique to a specimen in a collection. Researchers often collect duplicates that are then distributed to other collections, so, even the combination of collector name+collector number is not necessarily unique across different collections. Thus the same collector name+collector number for an occurrence record at the herbarium in Wisconsin (WIS) may refer to a physically different specimen, a duplicate in a different collection, the lichen herbarium at Arizona State University (ASU).
Collectors often want to credit colleagues who joined field trips. But collection numbers should not be combined with these associate collectors. To be unique they must be assigned by and refer to the principal collector only. In a database, the fields for collector and associate collector(s) should therefore be separate.
Catalog Number (barcode)
A catalog number is a unique identifier for a specific specimen in a specific collection. Unlike a GUID it is thus not globally unique, but still uniquely identifies records in a specific collection. It is generally recommended to use a combination of herbarium acronym (according to Index Herbariorum and/or GRSciColl) plus a sequence number. The acronym identifies the collection and the sequence number assures that numbers are unique.
Ideally, barcodes are used as catalog numbers. Using handheld scanners data entry errors can be avoided and scanning barcodes from packets is more efficient when retrieving records from a database.
It is best to avoid symbols when assigning barcodes as catalog numbers. Even though separating acronym and numbers by a hyphen or underscore, it is best to use a catalog number like ASUL019347 instead of ASUL-019347.
The reason:
Barcode scanners read barcodes according to the local language settings of a PC. Internationally different keyboards use different layouts. Thus, on an US American keyboard the hyphen “-” is located where on a German keyboard the letter ß is placed. If used with a German keyboard ASUL-019347 will thus be transcribed as ASULß019347.
Deciding how many digits to use depends to some extend on the size of the collection and an estimate how rapidly the collection is likely to still grow, but it also depends on the barcode format. Code 39 and Code 128 are commonly used barcode formats.
Code 128 can encode more data in a smaller space, it makes for smaller barcodes and is thus better suited to fit onto herbarium packets. Additional space may be saved by the number of digits encoded. Uneven digits generally require more space than even digits. Thus, a barcode using five digits (12345) will take up more space than the same number with a leading zero and thus six digits (012345).
Code 128 is less prone to erroneous readings, but only if a checksum is encoded with the barcode. Code 39 is less complex and generally more widely read by different barcode readers. However, most commercially available barcode readers now support many different formats, typically including both Code 39 and Code 128. The software BCRWatcher, shared here to facilitate specimen image capture, renaming image files with their barcodes and adding metadata, accepts both formats. When visually distinguishing the two formats, Code 39 can be recognized because it starts with two initial narrow bars separated by a wide space.
Archival barcode stickers can be purchased (see materials & supplies) and are best attached to the card onto which a specimen is mounted. This way specimens can be routinely imaged together with their barcode. The LichenLabler can then be used to print out a label with the same barcode on the packet. When barcoding existing packets, instead of printing a new packet, LichenLabler can be configured to print a replacement label or barcode stickers may be added to the packet instead. When imaging specimens, BCRWatcher can be configured to detect the barcode from the label and/or the specimen (typically when photographing a series of images of the packet and the specimen ‘By specimen‘ mode should be used).
Specimen barcode stickers: Code 128 allows for very small barcodes; at ASU we use six digit codes with the prefix ASUL, each sticker 0.875 × 0.412 inch (= 22 × 10 mm) on rolls of 1,000.
Exsiccatae
Exsiccatae are special collections used by researchers to distribute their expert taxonomic opinion. Instead of collecting single specimens and possibly a few duplicates, a large number of specimens, all of the same species, are being distributed to various herbaria. All duplicate specimens get the same exsiccatae number assigned. These specimens are thus identified by Exsiccatae Title (e.g., Lichenes minus cogniti exsiccati) + Exsiccatae Number instead of Collector Name + Collector Number. Since the specimens are not unique but duplicates in many different herbaria, they typically get accession numbers assigned when accessioned into a particular collection.
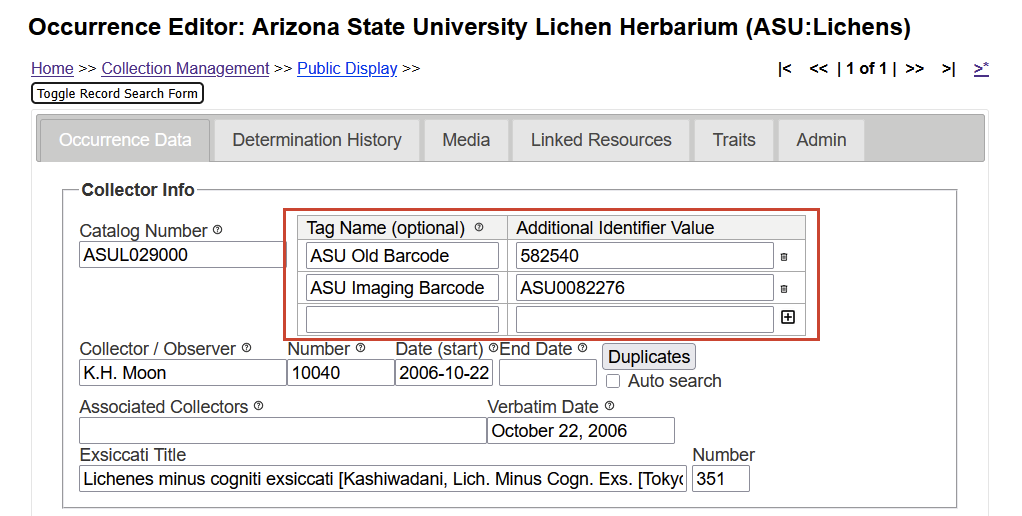
Other Catalog Numbers (= Tagged Additional Identifiers)
It occasionally happens that Catalog Numbers change, for example when a collection is donated from one herbarium to another one. There may also be other reasons: a change of barcode format, etc.
Because specimens may have been cited in the literature by their Old Catalog Numbers, these numbers must not be discarded. The Consortium database any previous catalog numbers can be tagged as additional identifiers.
Here an (unfortunate) example:
The ASU isotype of Agonimia koreana was collected by K.H. Moon with collector number 10040 and then distributed by H. Kashiwadani & K.H. Moon as Lichenes Minus Cogniti Exsiccati #351.
The original barcodes assigned to specimens at ASU simply were six digits without the herbarium acronym (582540). When the new collection building off campus opened and specimens were removed from storage to be put back into cabinets, it was decided image all type specimens together with the vascular plant specimens. These specimens were assigned a new barcode with the ASU prefix reading “ASU Vascular Plant Herbarium Specimen Image Number” (ASU0082276). This is misleading and to assure that all ASU Lichen specimens that are now on the shelves at ASU, we decided to assign new catalog numbers with the ASUL prefix (ASUL029000):
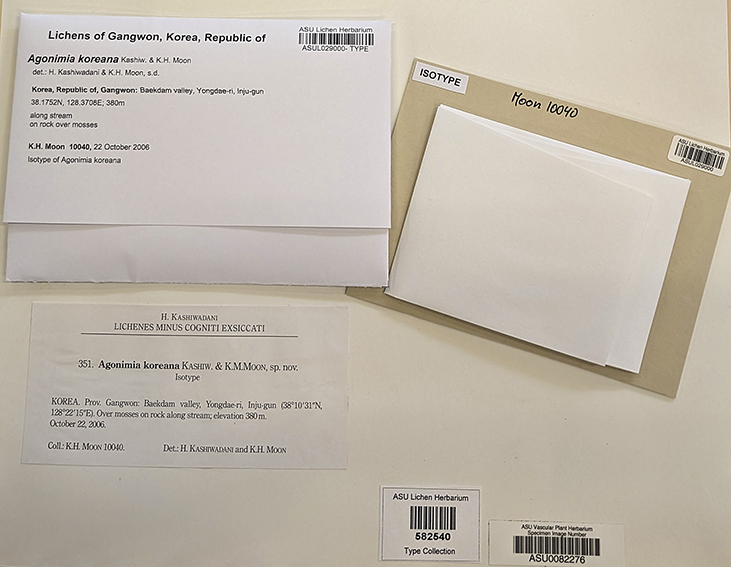
Different numbers: not ideal, but an example, where specimens got different numbers assigned.
Cross Referencing
Specimens that cannot physically be separated into different species necessarily must be placed into the same packet. Researchers rarely bother to identify every species in a packet. Typically the combination of collector name+collector number as well as the catalog number (bacode) is thus sufficient to uniquely refer to the most conspicuous thalli or the species considered most important (perhaps only a small thallus, but one of a particularly rare species).
However, there are scenarios, where it may be necessary to treat species records from the same packet individually. These species are not what is commonly referred to as associated species. Associated species are those observed in the field, but not necessarily collected. In the Consortium database associated species cannot easily be searched. Therefore, it is best to enter separate records for each species identified from the same specimen packet, for example, a lichenicolous fungus growing on a lichen thallus. The two specimens can then be linked as host and parasite.
During curation, before specimens have been identified, the same collector numbers have frequently been assigned to different species from the same specimen. Adding letters to these numbers (A, B, C, D, etc.) helps to assure that the collector numbers remain unique.
Managing these specimens as separate records in the Consortium database then requires assigning different catalog numbers (barcodes) to each record.
Cloning Records:
The easiest way to create such a record is by using the Record Cloning Tool in the Consortium database. It allows you to simply carry over information from the previous record and even define a relationship, for example whether the new record is a lichenicolous fungus growing on the main record as its host:
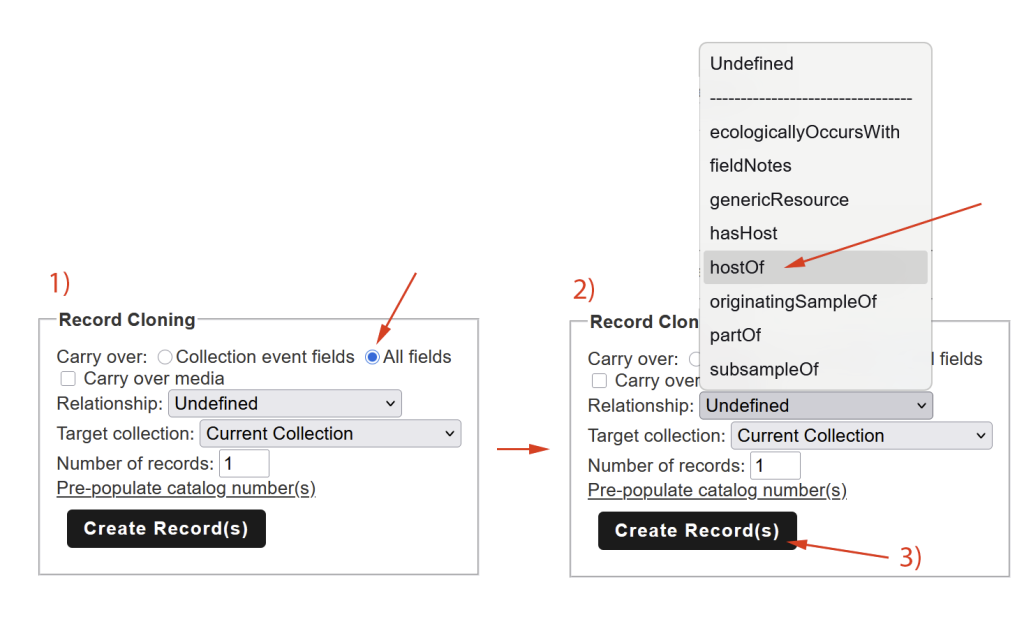
Cloning Records in the Occurrence Editor: (1) select to carry over all fields, (2) define the relationship of the new record to the existing one (for example: the new record is a lichenicolous fungus for which the current record is the host lichen; typically you would create a cloned record in the same collection you are working on, but you could also create a duplicate to be transferred into a different collection to which you have access), (3) create the cloned record, and (4) make sure that the record numbers (= collector numbers) are unique and each specimen gets its own catalog number (= barcode).
Filing Cross Reference Cards:
Filing specimens where species cannot physically be separated according to their species identification requires adopting a system of adding cross-reference cards to the collection. Labels for each record are printed. The packet is filed under the identification of specimen A, for the other species species the labels are filed as cross-reference cards, with a comment under which name the actual packet can be found.
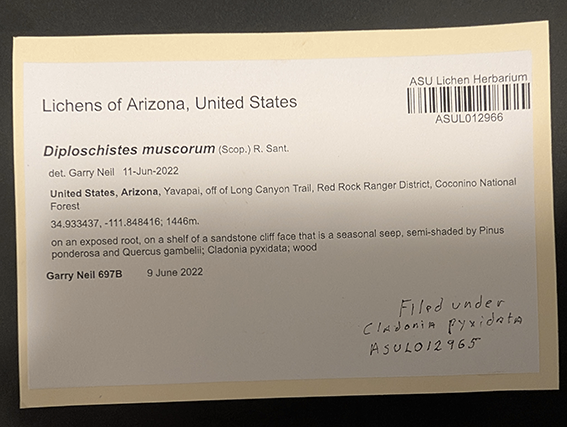
Cross Reference Card: Diploschistes muscorum is a lichen starting its thallus development as a parasite on Cladonia species and bryophytes. To manage both species records of the host and its parasite in the ASU database, each one gets a the same collection number assigned, but A and B are appended, each record accessioned into the herbarium under its own catalog number (= different barcodes). The specimen is then filed under the species identification of the first record, here Cladonia pyxidata (ASUL012965), whereas a cross reference card for the second record under its species name, here Diploschistes muscorum (ASUL012966). Both occurrence records can thus easily be found in the database as well as their corresponding specimens on the shelves in the herbarium.
_______________________________________________________________________________________
Materials & Supplies
Archival supplies for herbarium collections are often difficult to find and usually sourced from stores specialized in archival storage for museum collections. Below a list of materials needed and where these supplies can be bought in the US:
- archival packet paper to fold herbarium packets and print labels (in the US 8.5 × 11 inch letter format, elsewhere A4)
[Amazon sells heavy cotton paper suitable for sturdy packages as “Southworth 100% Cotton Business Paper, 8.5”×11”, 32 lb/120 g/m2; for labels printed separately the same paper quality can be bought at regular 20lb/75 g/m2 weight] - archival cotton padding to protect fragile specimens; it is important that the padding is relatively smooth so that fine structures (branches, isidia, etc.) are not ripped-off when the padding is removed
[available from medical supply stores, e.g., Oasis Cotton Cast Padding, 4″ x 4yds., 12/bag from MedVet] - for temporary storage of the specimens before printing labels, simply use ordinary paper
- cardboard used as packet stiffeners and to mount specimens; ideally cardboard should be archival (acid-free), sufficiently sturdy and not fluoresce in UV-light
[University Products cuts cardboard to size from sheets of Perma/Dur Tan Barrier Board, 39″ x 60″, 40 pt; this cardboard is very sturdy and archival, but it contains some optical brightener and thus has a weak UV-fluorescence; packet stiffeners from Herbarium Supply Company are archival and good for bryophyte specimens, but they are not sturdy enough and fluoresce brightly under UV-light, thus obscuring UV-reactions of lichen secondary metabolites] - archival boxes for bulky, heavy or very fragile specimens
[All Packaging Company make custom-size boxes from archival paper, e.g., 5 ½ × 3 ¾ × 1 ⅜ inch (= 140 x 76 x 25 mm), two piece set-up box 50pt WV inside and tight-wrapped, outside with rainbow café tan paper; individual boxes are expensive, cheaper if bought in bulk] - white wood glue (dries transparent) for mounting specimens and soil curation
[a cheap source is “Elmer’s Glue“; archival glue is more suitable, because acid-free when dried (available at Herbarium Supply Company as Missouri Botanical Garden Type Glue]. - archival barcode stickers are not essential but very useful; although it is possible to print catalog numbers directly onto your labels using LichenLabler, the stickers can be directly attached to specimen cards and if the specimen is mounted to the card are thus directly associated with the specimen
[Watson Label Products produces a wide variety of barcode labels; at ASU we use 0.875 × 0.412 inch (= 22 × 10 mm) Code 128 barcode labels on rolls with 1,000 stickers]
