Collecting Lichens
Here we provide some general recommendations on best practices for collecting specimens of lichenized fungi.
_______________________________________________________________________________________
Table of Contents
- Why Collect Specimens?
- When not to collect …
- Strategic Sampling
- How to Collect
- What Info is Needed?
- Why Record Habitat Data?
- Trimming Rocks to Size
- Collecting Tools and Supplies
- Other Aspects
_______________________________________________________________________________________
Why collect specimens?
Generally speaking, there are two main objectives why you may want to collect lichen specimens:
(1) For identification:
Even though image quality has much improved with the advance of digital photography, most lichen species unfortunately cannot reliably be distinguished just from photos. Even the best macro-photos typically do not reveal the characters needed for species identification. Thus, species identifications on popular websites are often inaccurate, even if they are labeled ‘research grade’…
For many foliose lichens it is necessary to check the color or texture of their lower side. Or how are they attached? with rhizines present or hapters? For crustose lichens it might be necessary to examine the spores or other anatomical characteristics. These must be examined with a microscope. A simple photo won’t do.
But even large and conspicuous lichens can often not be identified without knowing characteristics unavailable in a photo. What is their secondary chemistry? Frequently, simple spot tests will help. But for other species thin-layer chromatography is necessary to identify their secondary metabolites. Else, these species cannot be distinguished accurately. Finally, some cryptic species may even require molecular analysis.
Therefore, it is necessary to collect specimens for accurate species identification.
(2) To build up a specimen collection:
If you go through all the trouble of identifying specimens, you may as well document what you found. If properly curated, lichen specimens are preserved and stored for decades or even centuries, providing invaluable information for future generations of biodiversity scientists.
Generally, specimen collections provide important records that can be examined years to come. Historic specimens provide valuable distribution records from the past. Today, these records represent important baseline data to assess species rarity.
Scientific collections substantially differ from mere “stamp collections”. Your grandfather might have told you not to touch his most valuable stamps for fear of damaging them. Specimens in Natural History Collections are different; they are valuable only if accessible to research. If scientific specimens are not studied, examined, reviewed, if they don’t provide scientific data – then they are not worth anything to the scientific community.
Thus, if you decide to build up a collection, even one initially for your own reference, it is recommended to share these records with other naturalists and scientists – for example, through the Consortium of Lichen Herbaria.
_______________________________________________________________________________________
When would you not want to collect?
The term ‘taxonomic bias‘ sadly reflects that lichens remain much less well known than other, conspicuous and more iconic organisms. Even though many lichens are colorful, they frequently go unnoticed. But even naturalists intrigued by their beauty often find it too cumbersome having to build up a collection for specimen identification. If you are seriously interested in lichens, building your own collection its the best way to get to know these organisms.
It should be obvious, however, that, without the necessary permits, it is not legal to collect in protected areas (nature reserves, national parks, etc.). Also, on private property permission from the land owner generally is needed. This leaves public lands, where specimens can usually be collected without restrictions. But regulations vary significantly across different countries. In some countries permits are needed to collect just about anywhere, even on private property. You might even need a permit just to transport specimens. This can be a significant obstacle to biodiversity science, especially for organisms that are poorly known, like lichens.
All the more important is therefore to collaborate and share information about specimens.
Conservation: Obviously, it is not ethical to specifically target rare or even threatened species. Unfortunately, for most lichens, we still have inadequate information, which species are rare and which ones might be threatened [the Consortium maintains a Global IUCN Red-List].
To better understand species distribution and assess their threat status, it is still necessary to accurately identify the material. Therefore, it may frequently be unavoidable to collect specimens even of species that turn out to be rare. Ironically, it is often the rarest species that are least well known, or at least perceived to be rare. This is a strange dilemma. We do not understand how rare species are, if they do not get collected. And collections are necessary for accurate identification.
As a rule of thumb: if a species does not appear abundant at a particular site, preferably collect few or even no specimens. Most lichens grow slowly. This needs to be considered before you removing material. Some large lichens may be older than a tree. But unlike cutting down a tree, lichen thalli typically recover (at least slowly) from fragments and pieces. This means: although for species identification collecting representative material is necessary, it does often suffice to collect only parts of a specimen, i.e., a piece that shows all characteristics necessary for identification (see below). Make sure to collaborate with fellow researchers who can help to identify specimens and share occurrence records so that these records contribute to a better assessment how common or rare particular species are.
_______________________________________________________________________________________
Strategic Sampling
It is trivial that collecting specimens must serve the purpose of improving our knowledge about the taxonomy, biogeography and ecology of species. Any collection strategy should reflect this. Taxonomists will typically emphasize collecting a specific group of interest, whereas any inventory of species from an any particular area will aim more broadly at representing the diversity from that area.
Many species inventories focus on macrolichens only, thus unfortunately ignoring two thirds of the diversity present. The reason presented is based on the misconception that marcolichens are more easily identified. This is not correct. Several groups of macrolichens are enormously plastic in their morphology (e.g., Usnea, Cladonia) and or chemically diverse (e.g., Xanthoparmelia). They are more easily observed, but the species are not necessarily straightforward to identify.
Another misconception is to collect only few specimens. Any taxonomist knows that variation is only understood if enough material is available for study. But collecting a variety of specimens generally also facilitates identification, having a greater variety of specimens at hand generally helps to better understand the characteristics of a a particular species. Particularly when dealing with species groups difficult to identify, it is better to invest effort into collecting a range of specimens for comparison than investing that same time on studying few or even a single specimen.
Collecting a broad range of material is not necessarily against the above “rule of thumb” to avoid collecting too many specimens at sites were a species is rare. Of course, collecting rare species should be avoided. For slow-growing organisms like lichens the impact on population size of rare species is potentially enormous. But strategic sampling may help to mitigate the impact: a broad range of material collected not from a single site, but across its entire range will effect distinct populations less.
_______________________________________________________________________________________
How to collect specimens…
It is trivial not to use the same bag for collecting and storing specimens. A herbarium specimen deposited in a collection is material that has carefully been curated, prepared for long-term storage using archival materials. In the field you must not waste time on specimen preparation. Material used for collecting is disposable. It does not need to be archival: plain paper bags (lunch bag) and toilet paper to protect fragile structures.
There are several basic principles when collecting lichens:
(1) Never store specimens in plastic ‒ they will mold !!!
It is strongly recommended to use paper bags for collecting and storing specimens. Paper bags have many advantages:
Even in the rain, you can write notes directly on a bag using a simple pencil or water resistant pen. Specimens collected in paper can quickly be dried (still inside the bag). Even in the desert, specimens collected in the field may be damp and thus start to decay if placed inside plastic bags. And especially in the tropics it is typically not possible to collect dry material. To preserve this material, particular care must be taken to make sure that specimens are dried quickly.
Once mold starts to grow, the material will not only physically be damaged, but extracting DNA will likely result in sequences that correspond to mold rather than the principal mycobiont of the lichen symbiosis.
There are only two exceptions, when specimens should be placed in plastic bags, which must contain a strong desiccant (preferably silica gel with a non-toxic humidity indicator): (1) This may be necessary when working in environments that are wet for extended periods (like the tropics), and where it may not be possible to dry specimens any other way. (2) For species groups known to deteriorate quickly, collectors occasionally separate small specimens parts already in the field, placing these samples into zip-loc bags with silica gel, hoping to better preserve DNA for molecular analysis.
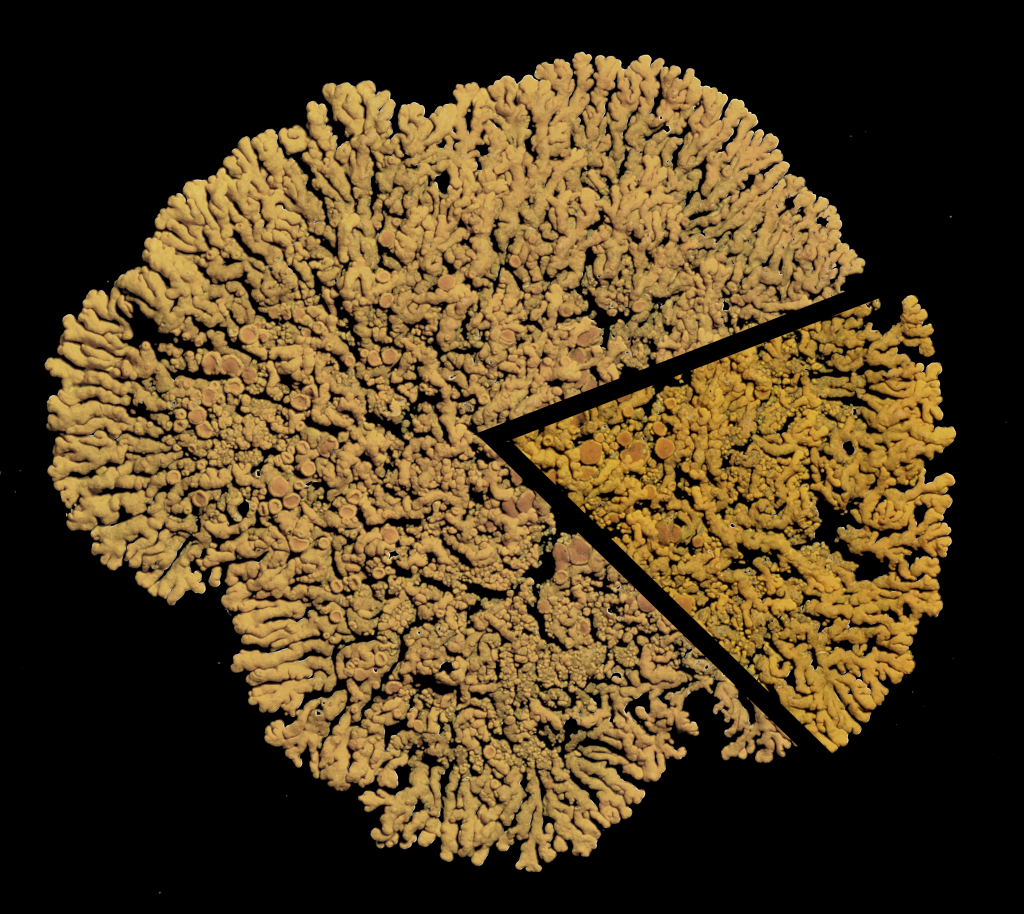
(2) What material to collect depends on the specimen: Get a good “piece of the pie” … !
Generally, specimens may be difficult top collect as a whole and for conservation, it is in fact be better to leave some material behind from which the lichen may again recover. But care must be taken that any specimen is representative for the whole thallus. Most lichens grow in circles, actively growing along the margin, developing reproductive structure in the center. Thus, the thallus margin can be quite different from the center. Both aspects, the center and the margin, are distinct and these characteristics are often relevant for identification.
If you cannot (do not want to) collect an entire specimen, it is necessary to collect both parts: the center and the margin. In fact, you may often get away with collecting only that “piece of the pie”. But don’t collect too little: There is a balance of collecting material sufficiently representative for a good herbarium specimen and fragments that are far too small to be useful (don’t waste your time on those).
Crustose and foliose lichens should generally be collected with part of their substrate. The substrate provides support and removing specimens usually causes damage.
Specimens growing on rock are often considered the most difficult ones to collect. A hammer and chisel will typically be necessary to remove them with their substrate. Looking for fissures and examining the grain of the rock may help to find pieces that more easily chip off. Some foliose lichens that are not too closely attached can also be removed carefully by sliding a knife underneath (some collectors use a narrow, flexible trowel). But once removed from their substrate these specimens will be fragile and more difficult to transport. Often it is better to collect even these specimens with part of the rock. And crustose thalli can generally not be removed without destroying the material.
Specimens on bark are more easily collected, typically by removing them with their substrate, using a pocket knife with a blade that can be locked. Ideally, don’t use a large knife, a short and sharp blade will do a much better job sliding into the bark, removing a piece with the lichen on top. Always be careful to cut away from your body.
On wood lichens should also be removed with their substrate. Dry wood can be very hard. Either use a wood chisel or a flat chisel also used to collect on rock. Some lichens (e.g., Cladonia) can be found on soft, partially rotten tree stumps, fence posts, or logs. They can be collected in a similar way as soil specimens (see below). Some lichens prefer growing in the crown of trees, where they might be impossible to reach. They can more easily be collected from fallen branches. But on the ground material soon starts to decay. Don’t collect specimens that have deteriorated, already disintegrating, typically displaying conspicuous discoloration or even infested by mold.
Fruticose species can frequently be removed from their substrate and collected separately. Nevertheless: it is important that you record what substrate a specimen grew on.
Some fruticose lichens are brittle when dry (species of Cladonia often reproduce by thallus fragmentation, others, like species of Usnea are generally tough, but have minute propagules that easily break off). These specimens must be wetted before collecting. For that purpose, ideally carry a small mister bottle filled with tap water (don’t use distilled water, cells may burst). When wet, lichens become pliable and specimens can then be flattened, even placed into a plant press. When flattened they can subsequently be stored more easily in herbarium packets. To study their original morphology flattened specimens will again assume their regular shape when wetted, even after decades of storage.
Soil specimens are extremely fragile. Unless they are vagrant these specimens must be collected with their soil attached. To prevent fragile material from breaking it will help to wet the soil. Loamy soil then typically keep together quite well. Sandy soil is generally brittle, even when wetted. Use the mister bottle to abundantly soak the specimen before collecting; be patient for the water to penetrate the soil. Then use a knife to cut out a large chunk not only of the lichen itself, but also its soil substrate (excess soil can be trimmed later during curation).
Fragile specimens need to be wrapped in “lichen wrap” (= toilet or tissue paper) before they are transported back to the herbarium. This is particular important for soil specimens, which can be exceptionally fragile. Generally, use abundant tissue to wrap specimens. But other specimens may also benefit from being wrapped into tissue; inside a bag rock pieces for example may rub against each other and the lichens on the surface may get damaged.
If you collected wet material, the tissue will absorb some of the moisture and help drying the material so it doesn’t mold. But excess tissue may prevent specimens from drying out. Therefore, make sure that wet specimens get dried reasonably quickly. Place the paper bags, with the specimens still wrapped, into the sun or close to a moderate heat source, e.g., a radiator, a light bulb (using an oven at high temperatures is generally not recommended, because this may damage the DNA). If using a drying agent (silica gel), make sure to replace it regularly to not exceed its water absorption capacity.
_______________________________________________________________________________________
What information to record …
Recording relevant collection information is an essential part of the procedure that must not be ignored. Sparse and sloppy collection data mean that a specimen is much less useful or even worthless. For assessing biodiversity, detailed specimen information can be incredibly useful.
Taxonomists typically aim at collecting a wide variety of specimens, ideally specimens of every species present at a particular site. They want to collect the “whole biodiversity” of a site (at least for the species group they are primarily interested in). Many collections made with this objective often fail to record detailed ecological data; it is frequently argued that collecting detailed habitat information is too cumbersome. This is unfortunate, biodiversity science is more than just taxonomy. Even if basic biodiversity surveys cannot focus on recording detailed ecological information, standardizing collection routines may help to greatly improve how informative that collection data may be.
If a few general principles are followed, it is possible to record detailed collection data very efficiently.
There are basically three kinds of data that must be recorded: who, when & where …
Who …?
In a herbarium, specimens are typically identified by ‘collector+collector number‘. For each specimen that combination must be unique. If you want to give credit to collaborators, who helped in the field, record them as ‘associate collectors’, but don’t use them as part of your unique specimen identifiers.
And a recommendation that may seem counterintuitive:
Don’t assign numbers to specimens in the field !!!
Lichens are best sorted and distinguished in the lab, using a microscope. In the field distinguishing different species can be problematic. It is much more efficient collecting specimens from the same microhabitat together, then sorting them out later (see below). In the field you want to focus on collecting and record necessary data, not waste time sorting out specimens.
When …?
Keeping track of the date, when material was collected should be obvious. It is important information, because with time specimens can be used to document changes in occurrence and distribution species.
Where …?
The most detailed information refers to the locality of the collection site and some basic ecological information about the habitat, where specimens were collected:
(1) Keep a field book ‒ General Locality
Even though general locality and habitat information could be written on the collection bags, repeatedly writing down the same information is inefficient. Use a locality acronym instead: each principal site gets a number assigned (perhaps with some letters designating the site, e.g., AZ1 for your first collection site in the state of Arizona, or COC3 for the third collection site you visited in Coconino County, Arizona, etc.).
Only write this acronym and the date on your collection bag. When you are visiting many sites over a couple of days, you can later organize your collection bags quickly when specimens are processed for curation and data entry in the herbarium.
This way, you write down the main information about your collections only once. That saves time!
The entries in your collection book will look like this:
- Locality Acronym, e.g.: AZ1
[use a simple acronym that identifies your collection site, one for each different site] - Collection Date, e.g. (use an internationally legible format): 30-Jan-2019
- Country, State, County; e.g.:
USA, Arizona, Maricopa (a Google Maps Site that has the counties is available at http://www.mob-rule.com/gmap). - Locality, e.g.:
along Apache Trail (state highway 88), two thirds from Apache Junction to Canyon Lake - Coordinates, e.g.: 33°31’06.0″N 111°27’28.1″W
- Macrohabitat (vegetation), e.g.:
Arizona Upland Subdivision, Paloverde-Cacti Mixed Scrub Series with Saguaro (Carnegia gigantea), Paloverde (Cercidium floridum), Buckhorn-Cholla (Cylindropuntia acanthocarpa), and Barrel Cactus (Ferrocactus sp.)
Why do you need to describe the locality, if you have the coordinates?
Writing down numbers, it is easy to make mistakes. If coordinates are wrong, a detailed description of the locality will be useful to correct the data.
Why even write down GPS data? A quick photo with a cellphone likely will record the coordinates?
Digital devices may fail. Your cellphone might not always record GPS data, when you take a photo. Even if it does, the phone could get damaged. The field is not a great environment for digital devices. Taking notes in a collection book is useful as a backup.
(2) Also for the field book: the Macrohabitat
For lichens ecological information about the macrohabitat and the microhabitat is clearly distinct. The macrohabitat refers to the ecological conditions at the overall site, where specimens were collected, for example, a forest, a cliff, a boulder field, etc.
Overall the macrohabitat conditions at the general site, where a specimen has been collected, may be significantly different from more specific ecological conditions at a microhabitat site:
On an exposed cliff, a lichen may grow inside a sheltered crevice or on the cliff surface facing the sun. In a forest, one lichen might be found on rotting wood at the base of a particular tree, whereas a different species may be growing on the tree trunk, or in the canopy of the same or even a different tree. On large boulders, lichens found on the top will likely be different from species on the front, in a crevice, or in a cavity below.
It is most efficient, therefore, to take notes about the general macrohabitat (e.g., a description of the overall vegetation with the most characteristic plants) as part of the general notes recorded for a collection site. Include this macrohabitat description in your field book, together with the site description ‒ identified by the locality acronym.
That way you know that each collection bag with the same locality acronym was collected at the same site, in the same macrohabitat, so in your field book, add to the list:
- … AZ1
- …
- Macrohabitat (vegetation), e.g.:
Arizona Upland Subdivision, Paloverde-Cacti Mixed Scrub Series with Saguaro (Carnegia gigantea), Paloverde (Cercidium floridum), Buckhorn-Cholla (Cylindropuntia acanthocarpa), and Barrel Cactus (Ferrocactus sp.)
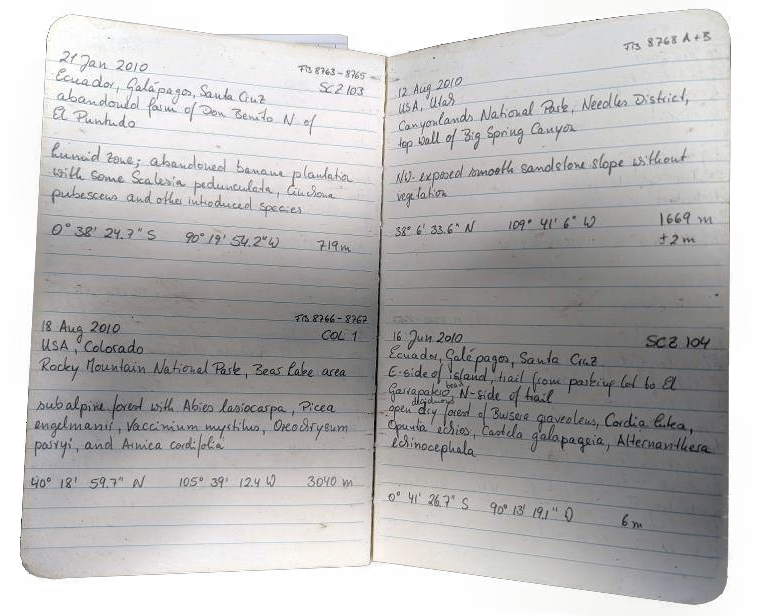
The field book: the detailed locality information corresponds to Location ID (e.g., SCZ 103 for collection site #103 on Santa Cruz Island, Galapagos). For more efficient collecting, collection bags are then labeled only with the corresponding Date and Location ID.
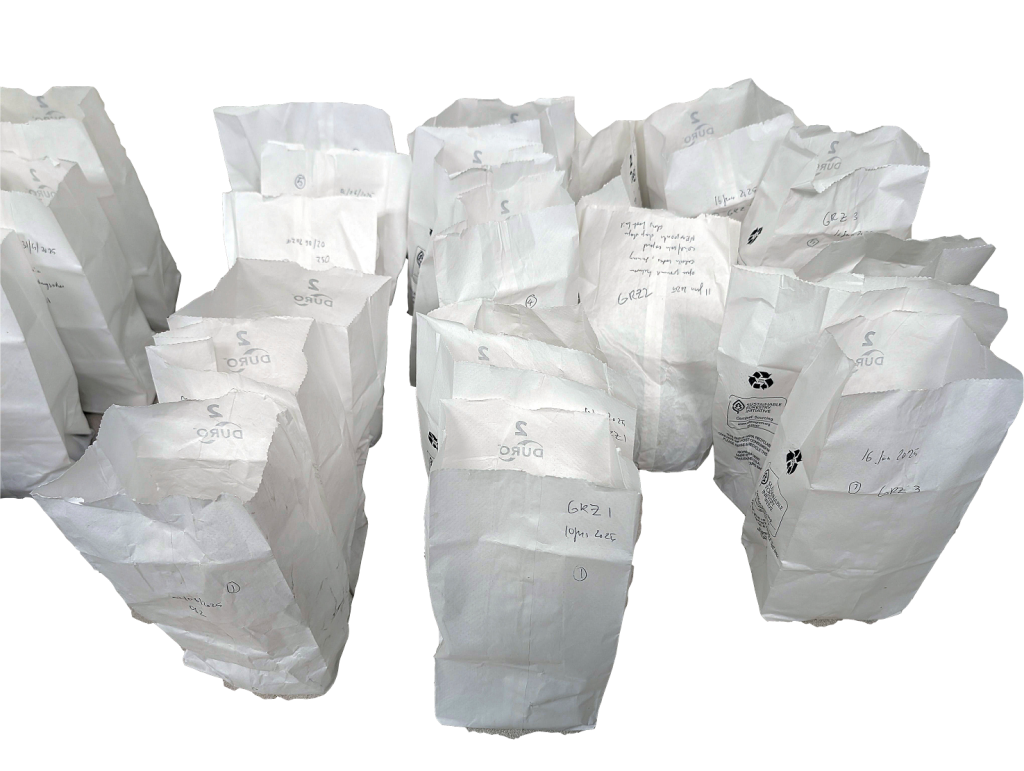
Collection bags: before curating the material sort the bags by Date and Collection Site (= Location ID).
(3) Ecological information specific to your collections ‒ the Microhabitat
Recording detailed microhabitat information on the collection bags is cumbersome and it is easy to forget recording some relevant ecological aspects that characterize the microhabitat. To annotate microhabitat information rapidly it is much more efficient to use habitat slips that can be placed into the collection bags together with the specimens:
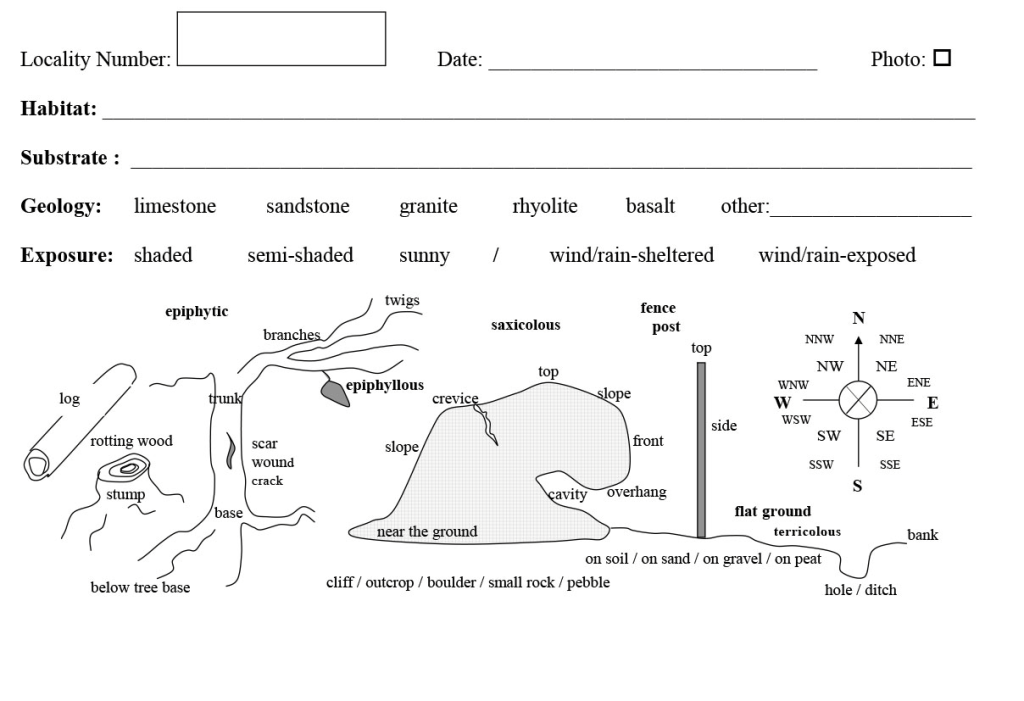
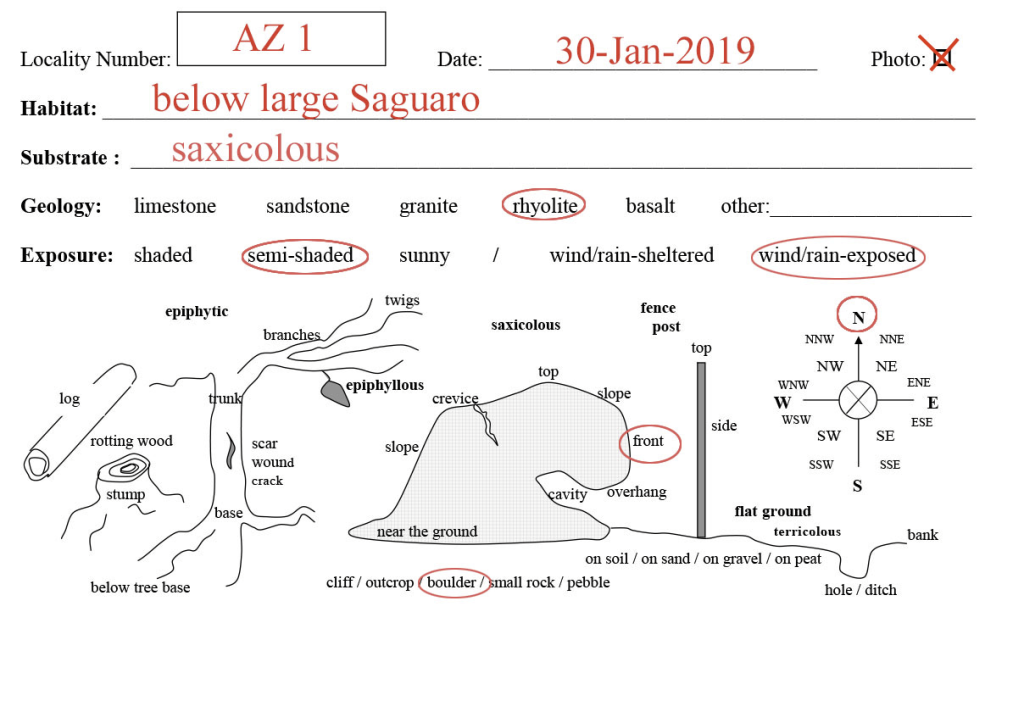
Quickly enter a locality acronym and the date, perhaps also add some specific habitat & substrate info and then highlight (encircle) the relevant microhabitat information, e.g.:
AZ1; 30-Jan-2019; below large Saguaro; on N-exposed front of rhyolite boulder, semi-shaded, wind/rain-exposed …
… will look like this:
Download a copy of the microhabitat slip here (this template will print 8 copies on a single page; you can then cut them to size to take along in the field, placing one habitat slip into each collection bag; you might have to adjust the margins slightly, depending on whether you use A4 or letter-sized paper):
Again, don’t assign collector numbers to specimens in the field:
At this stage it makes little sense to assign collection numbers to the specimens themselves. Instead, by placing several specimen from the same microhabitat into the same collection bag, adding a habitat slip to these specimens, individual collector’s numbers can be assigned later, when the specimens are sorted in the lab – and then one number per species/specimen should be assigned (see specimen curation).
Open packet with the habitat-slip: during curation specimens get assigned collector numbers; the range of numbers (in the above example #12089-12090) of specimens collected at the same microhabitat (i.e., to which specimens the habitat-slip applies) are added to the habitat slip, which is placed into the first packet.
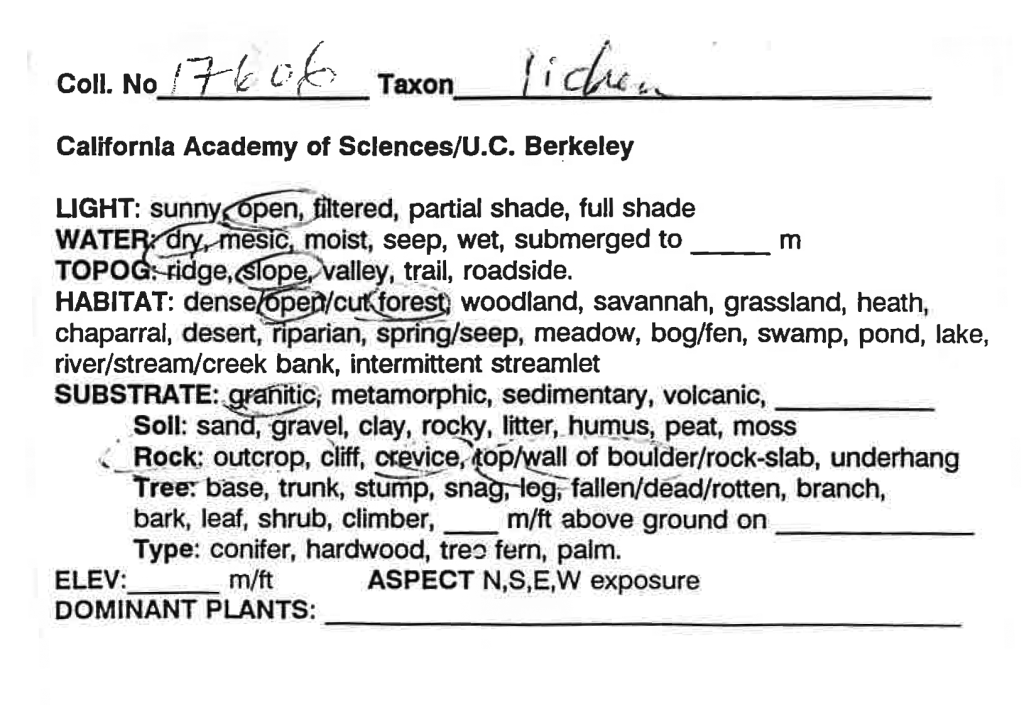
BTW – here is an example of a similar habitat collection slip, which James Shevock from the Californian Academy of Sciences used in the ’90s to record habitat data:
_______________________________________________________________________________________
Why record that much detail?
Assigning Microhabitat Traits
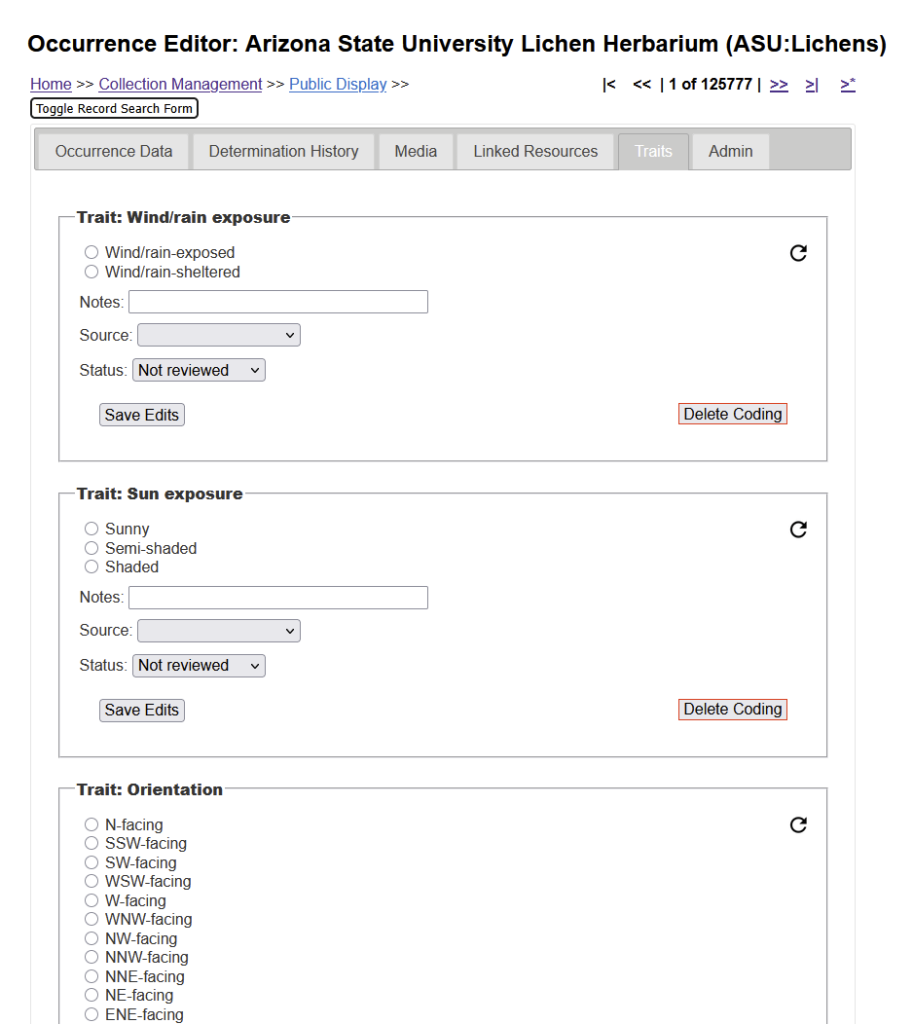
Following the standard from the microhabitat slip shared here, the Consortium of Lichen Herbaria provides options to code the microhabitat data as ecological traits for each specimen:
Mining Microhabitat Traits
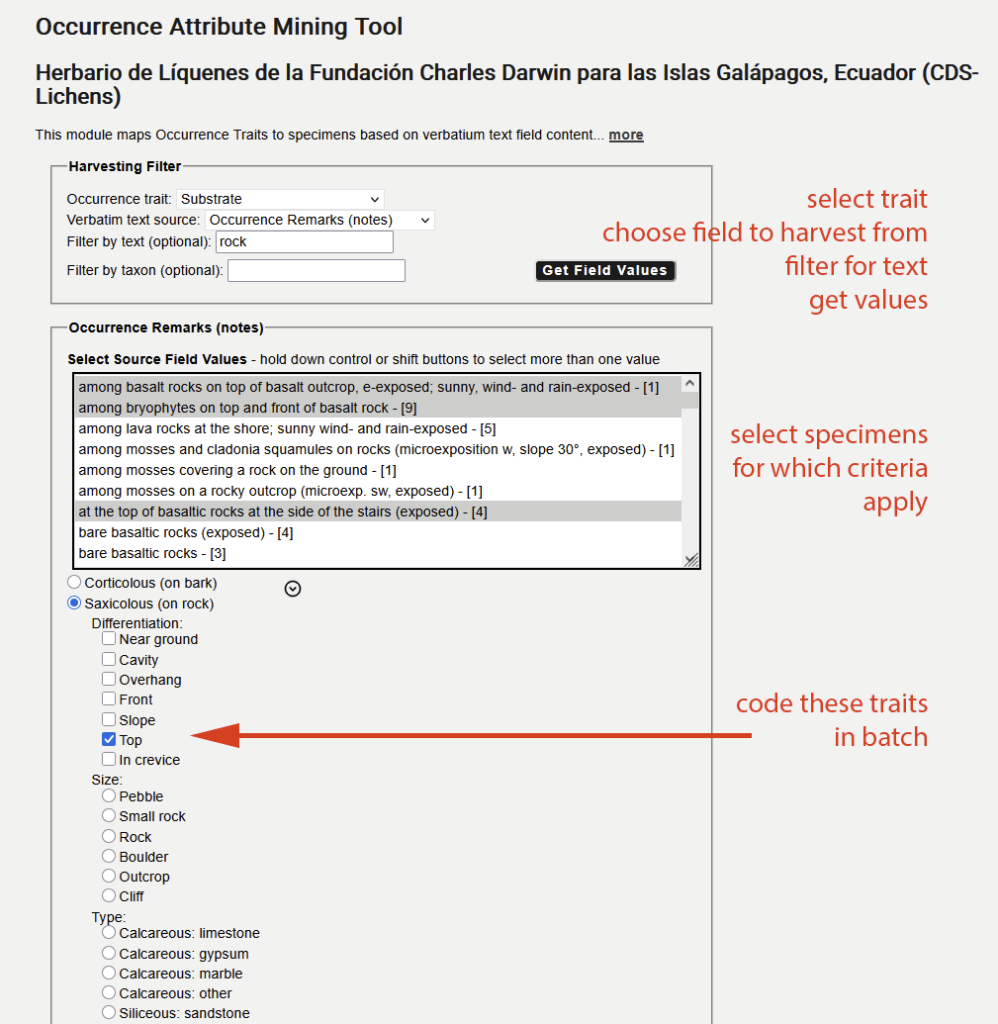
Coding traits individually for specimens can be cumbersome. If you enter the microhabitat data as part of the occurrence record, these traits can also be “harvested” in batch.
Navigate to your Data Editor Control Panel (My Profile > Occurrence Management > name of collection), click Occurrence Trait Coding Tools, and select “Trait Mining from Verbatim Text”. In the Harvesting Filter box, select the occurrence trait that you would like to score:
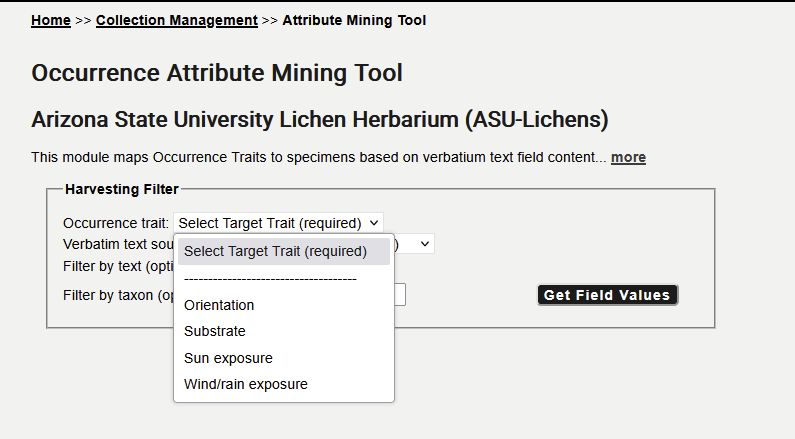
Then select the data field (= verbatim text source) from which you want to harvest the data, use some filtering criteria, and select the entries in the list for which that trait should be assigned in batch:
Analyzing Habitat Traits for Ecological Profiling
When habitat data are recorded in a standardized way, the data can be analyzed to assess ecological preferences of species, here an example from the Galapagos:
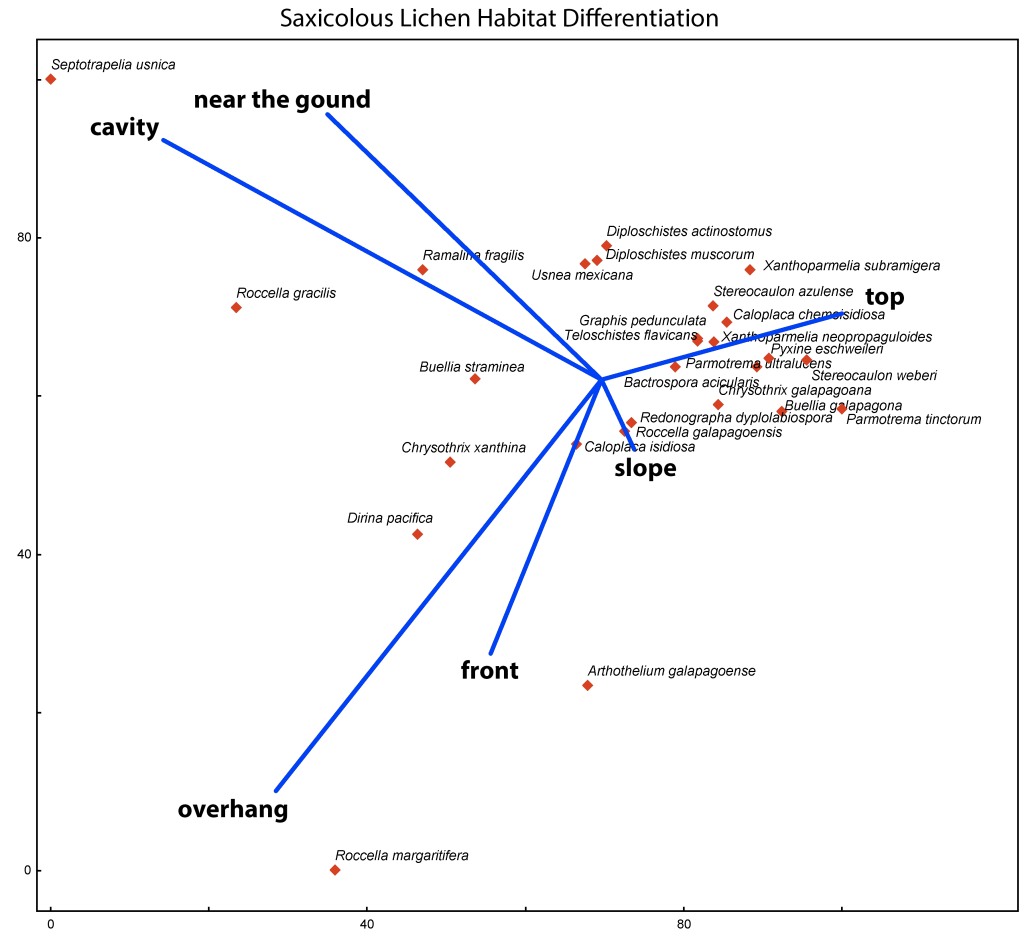
This principal component analysis in PC-ORD of 430 specimens of twenty-seven species illustrates the preferences of for a particular rock habitat.
Although in only relatively few saxicolous species were analyzed in this example, based on the microhabitat data recorded when specimens were collected, most species were found near the top or the slope of their rock substrates, few at the front, below overhangs, in cavities or near the ground.
Species Profiles
Analyzing both microhabitat and macrohabitat data of specimens collected in the Galapagos, ecological species profiles further distinguishes habitat preferences:
Buellia straminea
macrohabitat
• coastal zone
• on rocks (lava flows, etc.)
• most common on bare lava flows
• in Grabowskia/Opuntia
scrub woodland
microhabitat
• small rocks & boulders
• mostly at the front
Buellia galapagona
macrohabitat
• coastal zone
• on rocks (lava flows, etc.)
• most common on cliffs
• in Cryptocarpus scrub
and Bursera/Opuntia woodland
microhabitat
• cliffs & outcrops
• more common on the top
_______________________________________________________________________________________
Trimming Rocks to Size:
When collecting saxicolous lichens (lichens growing on rock), ideally, try to chip off a piece with hammer and chisel that fits well into a packet or a small box.
However, rocks can be challenging and ason Hollinger just shared a cool video how to trim unwieldy specimens down to size (ATTENTION: you do this at your own risk, we cannot be held responsible; this is very dangerous; you can easily harm yourself !!! ).
_______________________________________________________________________________________
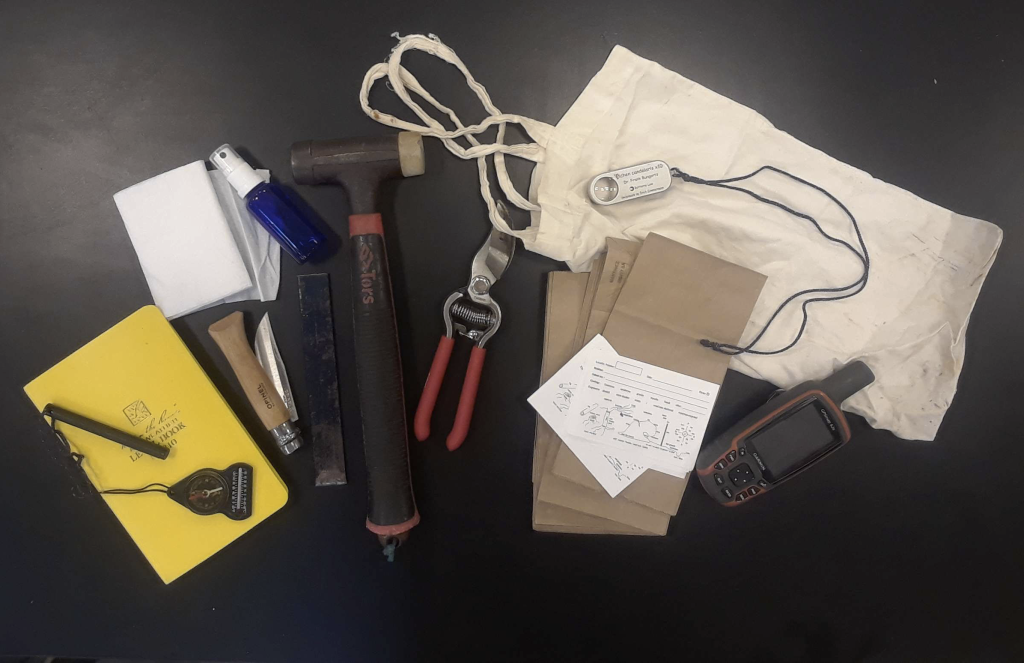
Collecting Tools & Supplies:
essentials:
- hammer [do not invest in a geologist hammer; ‘dead blow metal hammers’ are relatively light weight and because of the steel pellets inside the steel head don’t bounce back; they thus deliver a stronger blow at less weight (e.g., in the US you can purchase the Eastwood 32277, 36 oz Flat Face Dead Blow Hammer)]
- a short and stout cold chisel [e.g., 1/2″ × 6″; you can get these cheap at most any hardware store; much more fancy are hardened carbon steel chisels, they keep sharp a lot longer, but are much more expensive and difficult to re-sharpen]
- rock splitting chisels [in the US a good choice are the flat chisels manufactured by Geo-Tools; the ones on their website are too long, but you can ask to have these cut to size at 3/4inch × 1/8″ × 6.77″]
- sturdy knife [ideal is a medium sized pocket knife with a blade that can securely be locked (e.g., Opinel Carbon Steel Blade No. 9; the blade is not stainless, but stays sharp much longer); depending on collection preference you could also carry a wood chisel]
- 10× hand lens: invest in a higher quality lens with a wide field of view (e.g., a 21 mm diam. triplet); recommended are optically corrected lenses (triplets, achromats) with little or no edge distortion; at larger magnifications the field of view increasingly becomes narrow and correcting for distortion becomes more difficult; thus it makes mores sense to invest in a high-quality 10× hand lens than a 20× low quality lens [working inside a forest with dim light, some hand lenses with LED lights might be useful; very high quality and thus popular but expensive are the Lichen candelaris hand lenses manufactured in Switzerland by Erich Zimmermann]
- canvas bag(s) [useful to carry, organize and separate collection bags from multiple trips; again do not use plastic bags; e.g., these Canvas Tote Bags]
- small paper bags for collection of specimens [don’t use plastic, specimens will mold, a good size are 4 1/8″ × 8″ (10 × 20 mm) lunch paper bags]
- “lichen wrap” (= toilet paper for wrapping fragile specimens)
- mister bottle to wet soil specimens (e.g., 2oz Amber Glass Spray Bottles)
- field notebook (for field notes on localities; e.g., Rite in the Rain Weatherproof Notebook)
- microhabitat information slips (print out and cut to size from PDF)
- small compass (to record the cardinal direction of microhabitat orientation, e.g., N-exposed, W-exposed, etc. ‒ convenient if you attach the compass to the lanyard of your hand lens]
- GPS (best: with barometric altimeter built-in) [although cell phones can be used to record coordinates, it will be less precise and particularly the altitude will not be very accurate]
desiderables:
- [small boxes for fragile soil specimens]
- [clippers to collect twigs & branches]
- [digital camera with macro lens, tripod and/or flash; cell phones can be used, but their macro capabilities are still limited]
- [slim trowel or artist’s spatula (to remove tightly attached foliose specimens from their substrate)]
- [refillable technical pen “radiograph” (KO-I-NOOR) filled with spot test chemicals P, K, C, I]
- [portable UV flashlight (important: check for correct l265nm wavelength)]
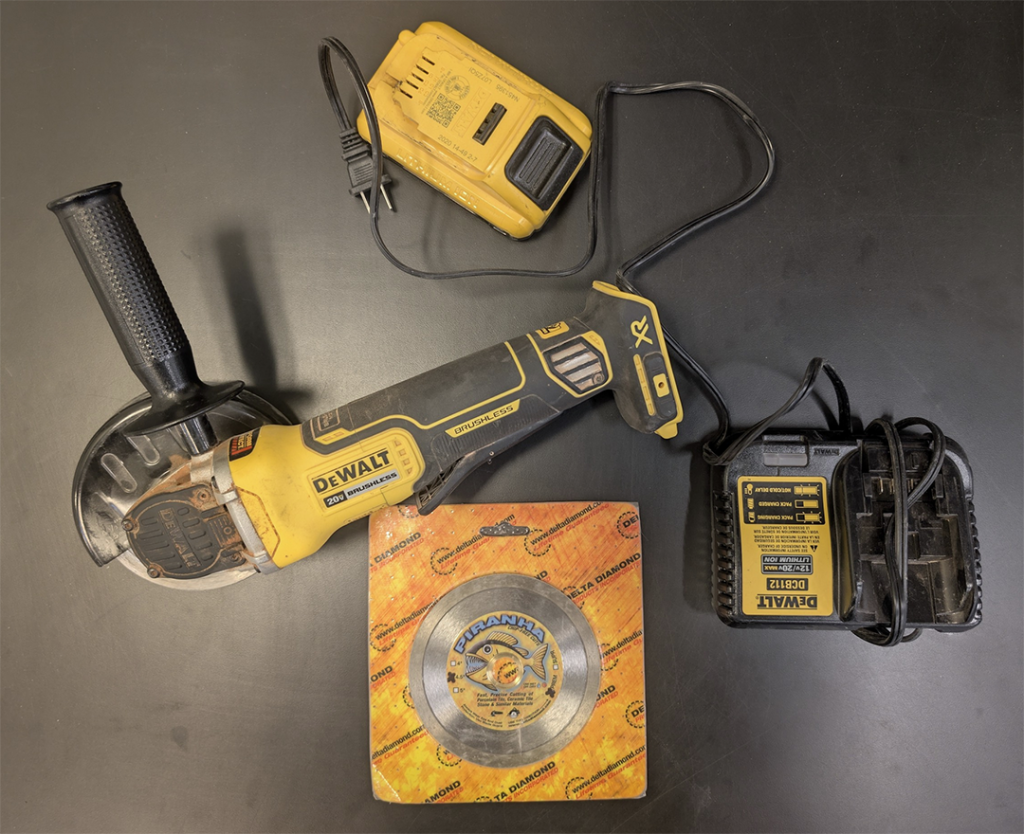
… and if you are desperate (and daring) to trim some rocks:
Below an image of the handheld battery-powered angle grinder with diamond-coated blades (4.5 inch Diamond Piranha Premium 4 1/2 Inch Tile Diamond Saw Blade). In the video above, Jason is clamping the grinder to a pole. You can also use a vise, but it can be rather difficult to clamp some irregular rock safely into a vise.
Theoretically, you could take battery-powered grinder into the field.
But no matter what you do: Be careful – the diamond blade will cut through anything !!!
You do this at your own risk !!!
_______________________________________________________________________________________
Other important aspects:
Dress appropriately, don’t wear your finest clothes. Make sure someone knows where you are, best not work in the field alone so someone can get help in case of an emergency. Make sure you keep track where you are. Use common sense and caution. Using a hammer, chisel, and a knife for collecting specimens you can easily hurt yourself.
- strong walking boots
- sufficient drinking water
- sun protection, bug repellent
- sweater / rain jacket
- lunch (if the field trip lasts the whole day)
- first aid kit (small kit for the field)
- backpack to carry collection gear and supplies
- hiking map
_______________________________________________________________________________________
