BCRWatcher
version 0.10.3.5
– a program by Daryl Lafferty, Arizona State University –
Daryl Lafferty and I here at ASU are excited to introduce BCRWatcher, a program that facilitates image acquisition, file renaming and harvesting of skeletal metadata as part of the GLOBAL TCN.
Note: BCRWatcher is a much more sophisticated replacement for ‘Barcode Renamer’, a program that can still be downloaded here. Barcode Renamer only renames files in a folder without moving them and without the option to include metadata. Since Version 0.10.0.1 of BCRWatcher that option was also added as ‘Rename Only’. Therefore, it is not necessary to download the old software ‘Barcode Renamer’. Instead, simply download BCRWatcher abd choose the ‘rename only’ configuation option (remember to save this configuration afterwards via ‘File > Save Settings’, else the settings will not be maintained upon restart).
______________________________________________________________________________________
Table of Contents
- What’s new …?
- Download the Newest Versions
- Quick Start
- Installation
- Overview: how the program works …
______________________________________________________________________________________
New in Version …
Version 0.10.3.5
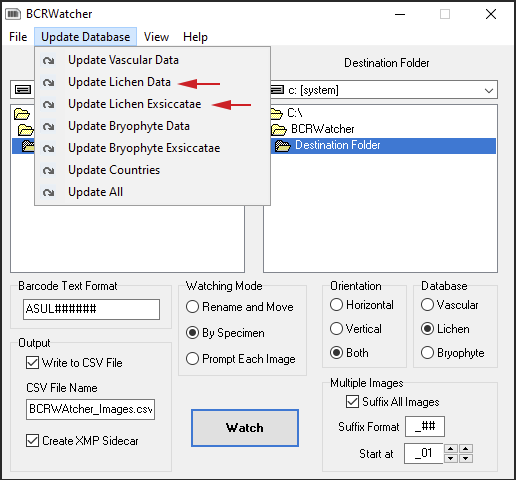
Version 0.10.3.5 uses the new Symbiota API to update the list of taxon names directly from the Consortium of Lichen Herbaria (lichen names: ‘UpdateDatabase > Update Lichen Data‘), the Consortium of Bryophyte Herbaria (bryophyte names: ‘UpdateDatabase > Update Bryophyte Data‘), or SEINet (vascular plant names: ‘UpdateDatabase > Update Vascular Data‘), as well as the list of exsiccatae (lichens: ‘UpdateDatabase > Update Lichen Exsiccatae‘ or ‘UpdateDatabase > Update Bryophyte Exsiccatae‘).
Version 0.10.3.1
PLEASE NOTE: update to the newest version to be able to still update the taxon names and exsiccatae that the program uses. The program is otherwise still fully functional, but updating no longer works.
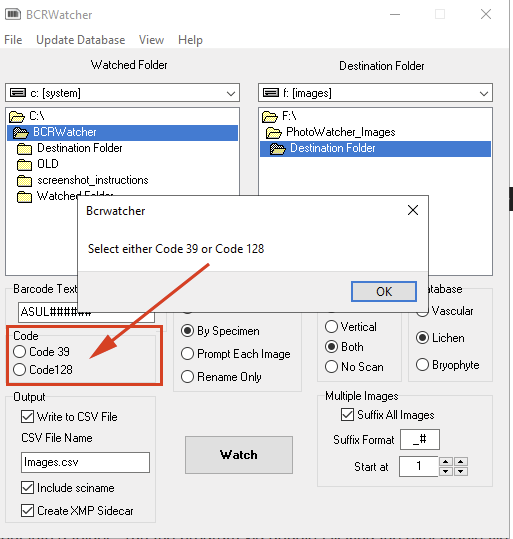
Version 0.10.3.1 now asks you to choose one of two different barcode formats: code 39 or code 128. If you are uncertain which of the two commonly formats you are using, try them out both (once you know which code is working, don’t forget to use ‘File > Save Settings’ so you do not have to re-configure this upon restart) :
Rename Only: The new version now also has an option to generate a CSV that includes a ‘sciname’ column, i.e., the scientific name without the author (the format that Symbiota uses natively).
Version 0.10.0.1
The new version now includes an option to rename files only (Rename Only). This option works identical to the Barcode Renamer (BCR), which means the program doesn’t need to run during image acquisition, but it can be used to rename images inside a folder in batch, without adding metadata and without moving the files from a Watched Folder to a Destination Folder.
Alternatively you can access it via this GoogleDrive link.
[This Google Drive link provides access to the same Zip-Archive, but you will manually need to change the extension from BCRWatcher.RENAMED to BCRWatcher.zip, before you will be able to extract the files and thus install the program.]
______________________________________________________________________________________
Download the Newest Version
______________________________________________________________________________________
Quick Start
(1) Download the Zip Archive- extract the content into a folder – run the program via double-clicking the executable file (*.exe; ignore Windows security warnings; the program is safe).
(2) Start your image acquisition program (tethered camera, scanner) and set it to drop the files into the ‘Watched Folder’.
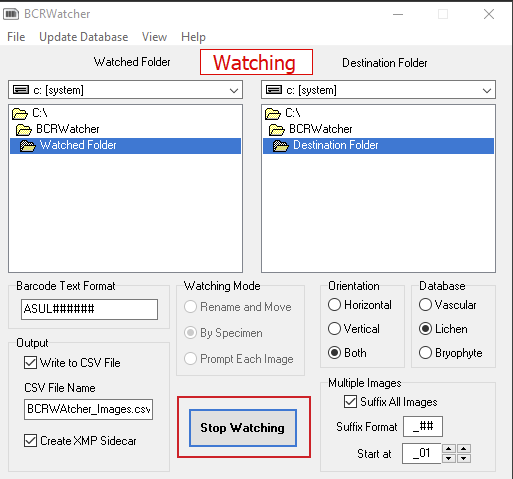
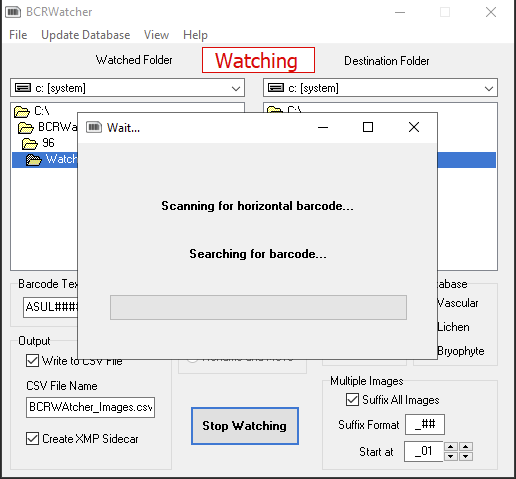
(3) Click ‘Watch’ to start BCRWatcher monitoring the ‘Watched Folder’ for new files.
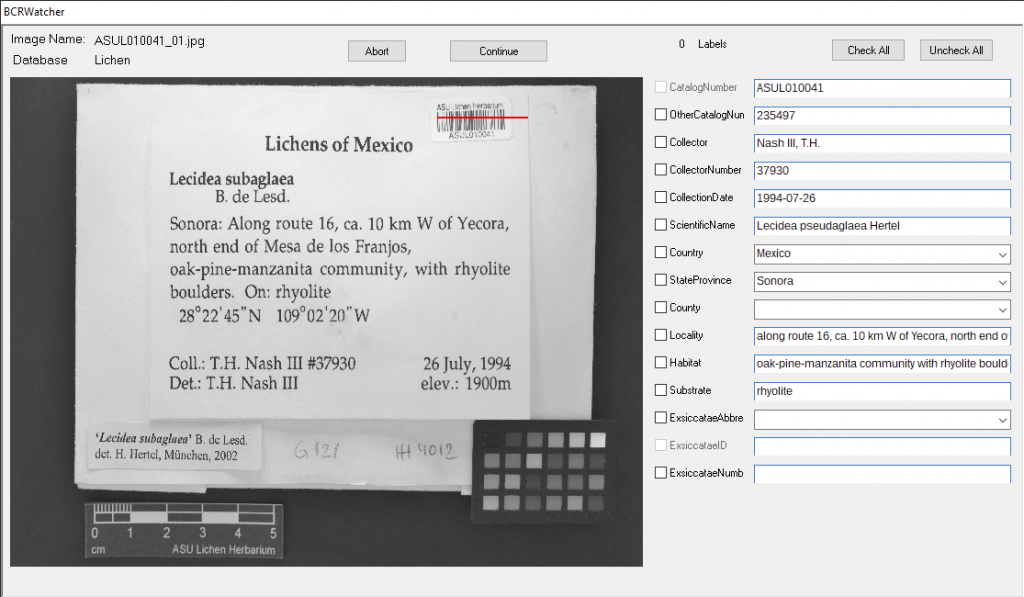
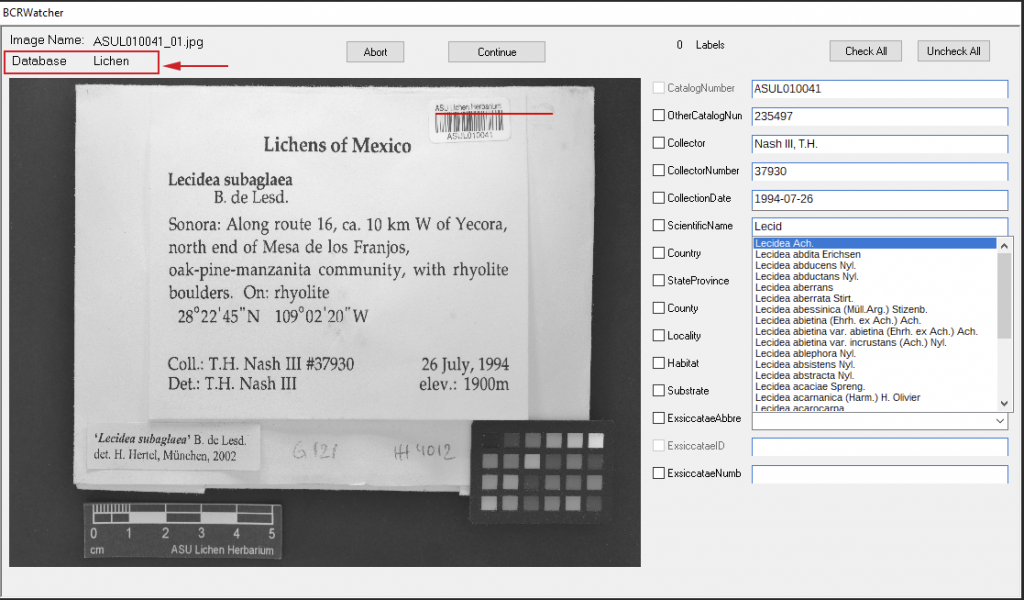
(4) Take a photo (or scan an image). When the image arrives in the ‘Watched Folder’, it will be scanned for a barcode, a preview and metadata entry form will pop up.
(5) Enter metadata and hit ‘Continue’.
(6) In the default configuration metadata will be written into the XMP metadata of a JPG file, as an XMP sidecar for the RAW image files, and as a CSV. The file(s) will be renamed and copied into the ‘Destination Directory’.
(7) In the default configuration the program works in ‘By Specimen‘ mode:
Only the first image in a series is being scanned for a barcode; after metadata have been entered all subsequent images will be renamed using this barcode and will get the same metadata assigned.
IMPORTANT: If you start imaging a new specimen, stop and re-start Image watching’.
(8) All settings can be changed and saved as a new default via ‘File – Save Settings’.
Below more detailed instructions & context …
______________________________________________________________________________________
Installation
The versions of the program will be distributed here as BCRWatcher_yyyy-mm-dd.zip. This file is a Zip Archive; it contains all necessary files. Please download this Zip Archive when you first install the program. This zip contains all necessary files (important: some firewalls will not permit you to download a Zip Archive; the alternative is to download the file with the extension *.renamed and, once downloaded, change that extension to *.zip).
Simply extract the whole archive into C:\BCRWatcher\ and execute BCRWatcher.exe via double-click. If your PC is connected to the internet, you have access to a help file from the Help menu. The help instructions are mostly copied from the BarcodeRenamer (BCR) and still being updated.
______________________________________________________________________________________
Some background …
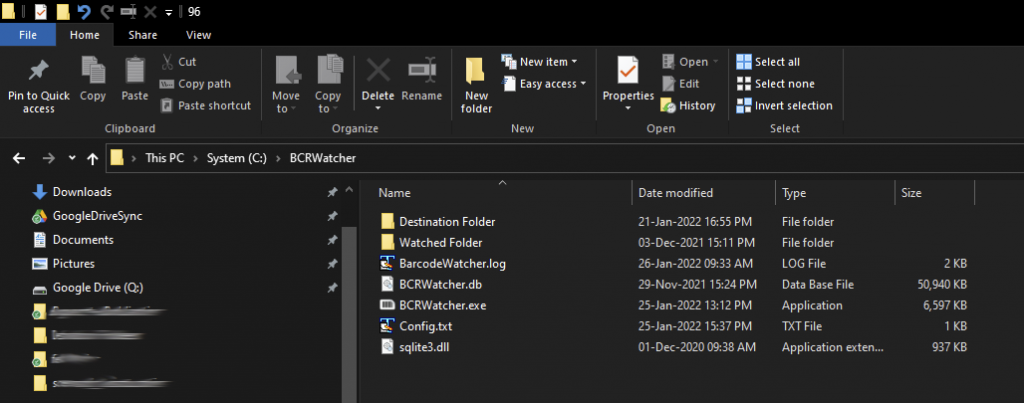
The program needs the following folders and files:
(1) BCRWatcher.exe = this is the executable file. Double-click will run the program. The Windows operating system might warn you against running the program. The program is not harmful to your PC. You can ignore that warning
[you can create a shortcut to the executable to more easily start the program; on your desktop “right-click – New – Shortcut: C:\BCRWatcher\BCRWatcher.exe’].
(2) BCRWatcher.db = is the database that the program uses for entering skeletal metadata; it is the file that is being updated via “Update Database”.
(3) sqlite3.dll = is the SQLite database driver necessary for the database to run; again place it in that same folder as the database and the exe file.
(4) BarcodeWatcher.log = this file is not necessary for the program to run. It is an extensive log that we use for troubleshooting. The text file can become fairly large. As a maintenance task you can periodically delete the file.
(5) Config.txt = this file is the configuration file being saved in BCRWatcher via ‘File – Save Settings’. It is a simple text file that you can also edit manually.
(6) You also need two folders for the program to run, a ‘Watched Folder‘ and a ‘Destination Folder‘. When you first extract the program from the Zip Archive, it will create two folder named this way and the configuration options will use these folders when you start the program. But when you integrate the program into your own workflow, you might want to choose any different folders on your hard drive to function as the “watched folder” and “destination folder” [only condition: these two folders cannot be the identical].
______________________________________________________________________________________
Beta Testing
If anything doesn’t work as expected, please help us troubleshoot. The program currently writes an extensive error log file (BarcodeRename.log). Please always supply that log file with any email when you report a bug [you can read the log file via ‘View – Log File’; in the current beta version the ‘Debug Mode’ cannot be turned ‘on’ or ‘off’, it is always turned ‘on’; once the program has been tested more widely, the default mode will be Debug Mode ‘off’].
______________________________________________________________________________________
Updates (future versions)
During our beta testing phase we will be using the following link to share any updates: ../RENAMED. Most updates will require only replacing the BCRWatcher.exe file. Remember to always rename the file to BCRWatcher.zip to be able to extract the exe file.
______________________________________________________________________________________
Overview: how the program works …
You might all already familiar with Daryl’s BarcodeRenamer (BCR), which is able to scan a directory of image files, detect a barcode within the images and rename those files with the barcode as its new file name. Some of you have also used Robert Anglin’s Java applet, which allows harvesting skeletal metadata for occurrence records as part of the image renaming process.
Daryl’s BCRWatcher combines these two aspects, but does quite a bit more. And it can be installed without Java. The program thus adds flexibility and additional functionality.
Here is what this program does:
As the name implies, BCRWatcher does not only read barcodes within an image and then renames these image files accordingly, but it will “watch” a folder for any new images to arrive, and, as soon as they do, scan these files for their barcode. If a barcode is detected in the image, the program renames the file using that barcode as the file name.
Even better: images that do not contain a barcode as an element in the picture itself can still automatically be renamed, using a previous barcode (or any string of characters) by entering that barcode manually via the keyboard or (recommended) using a barcode scanner.
How does this work?
The BCRWatcher waits for a new image being dropped by a camera tethering software into any folder on your hard drive that you selected as the ‘Watched Folder‘ [this should work with any scanner, camera brand, tethering software configured to save files in a specific folder, or, even manually via ‘drag & drop’ or ‘copy – paste’].
As soon as an image arrives, the program scans it for a barcode. If a barcode is detected, BCRWatcher will use this barcode for renaming the file. If a barcode can not be detected (or if no barcode is present in the file), the program allows the user to enter it manually [strictly speaking you don’t even need a barcode; any string of characters and/or digits can be used, when manually entering the catalog number; that string of characters will then be use to rename the file(s) – this means you can even use the program to quickly rename files any way you like].
______________________________________________________________________________________
Metadata
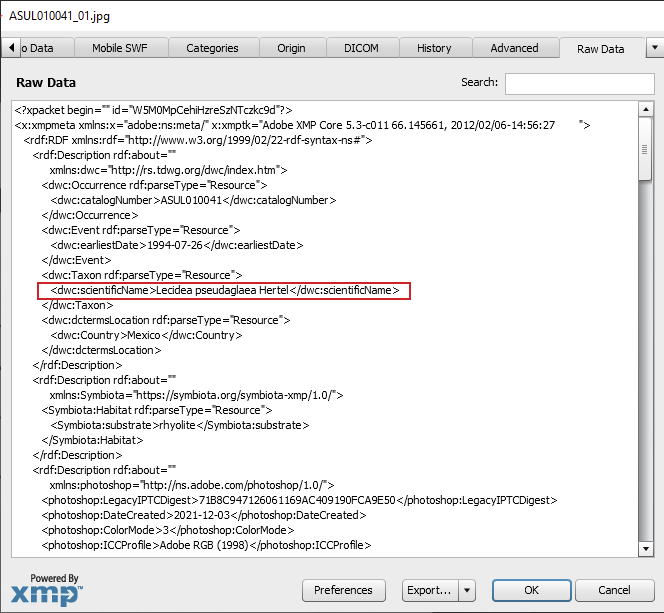
BCRWatcher does not just rename files during image capture, but it also embeds metadata into the image file(s) themselves. The metadata are written to the files as XMP (both as DarwinCoreXMP, and as Symbiota fields that are currently not supported by DarwinCore, newly defined as SymbiotaXMP. The data always travels within the image file itself and can be accessed by any program that fully supports XMP (e.g., Phil Harvey’s ExifTool, or IDImager’s PhotoSupreme; the data can also be accessed using ‘File – File Infi’ in Adobe Photoshop) .
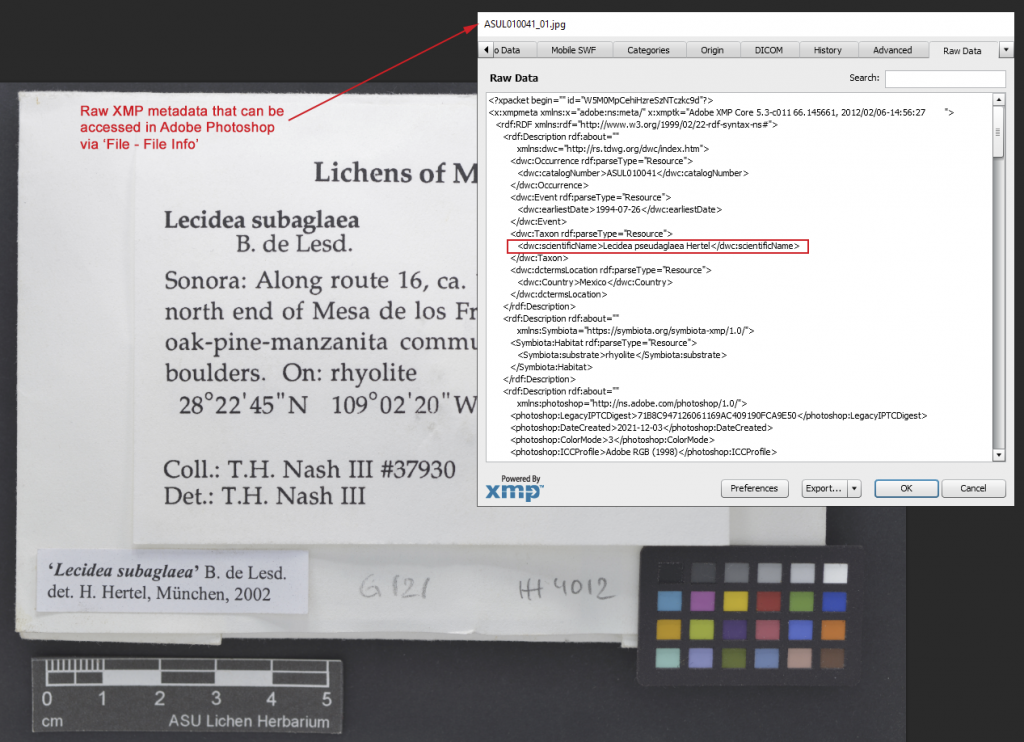
XMP is an image metadata standard developed by Adobe and widely supported by different programs. Our plan is to have the Symbiota portals eventually harvest the metadata directly from the image file itself, thus rendering a separate CSV skeletal metadata upload obsolete.
______________________________________________________________________________________
Metadata Configuration Options:
As part of the copy and renaming process, BCRWatcher allows you to capture skeletal metadata, i.e., a subset of fields from an occurrence record that are useful for better matching an image to an existing record in a Symbiota database, or, if no such occurrence records exists, use the skeletal data to populate some of these fields.
You can configure the program to capture skeletal metadata in several ways:
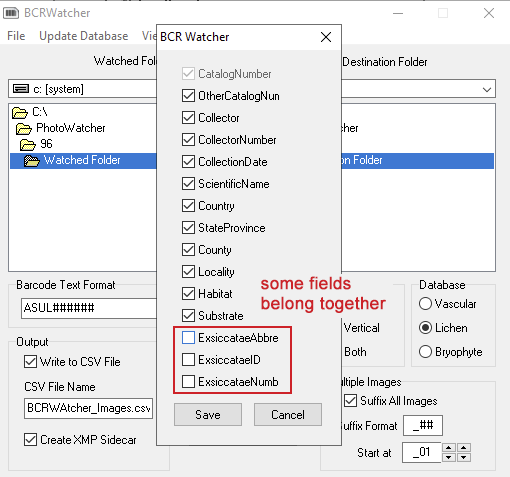
(I) via ‘File – Select Fields” you can choose which skeletal metadata should be captured (please note: version 0.9.0.2 now supports many additional fields).
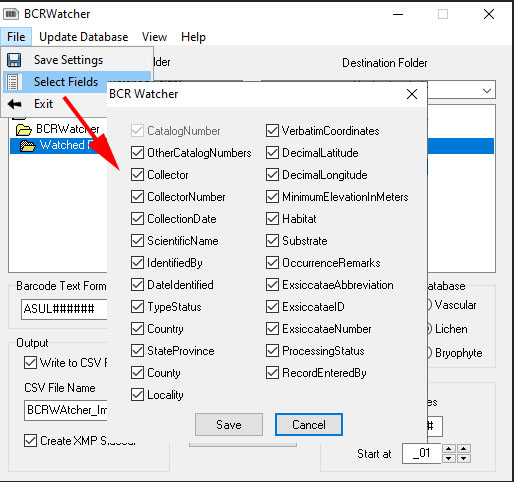
Whenever changing your selection of fields, don’t forget to save via File – Save Settings.
(II) Most modern cameras can be configured to capture image files both in the native camera raw format (Canon = *.CR2; Nikon = *.NEF; Sony = *.AWR) and simultaneously also as a JPG (a version developed during capture by the camera from the raw data).
BCRWatcher can only detect barcodes from JPGs, it can not analyze raw image data [unfortunately, there are simply too many varieties of raw file formats out there to support this functionality]. Therefore, the program will only work, if you (a) either shoot “JPG only”, or you configure the camera to capture “JPG+RAW” image pairs. BCRWatcher will treat these pairs de facto as one single image; scanning only the JPG for the barcode. If you have no use for the JPG, you can discard it after the image pairs have been processed by BCRWatcher.
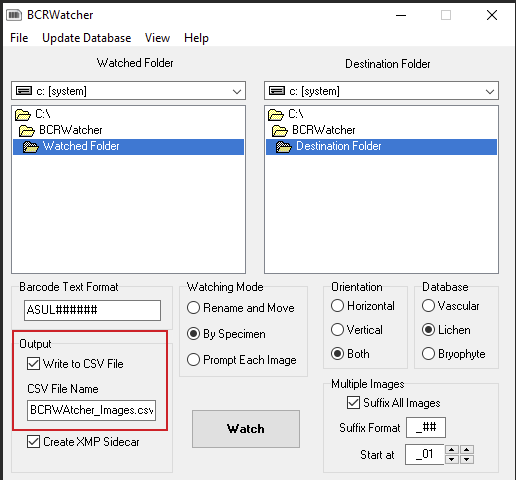
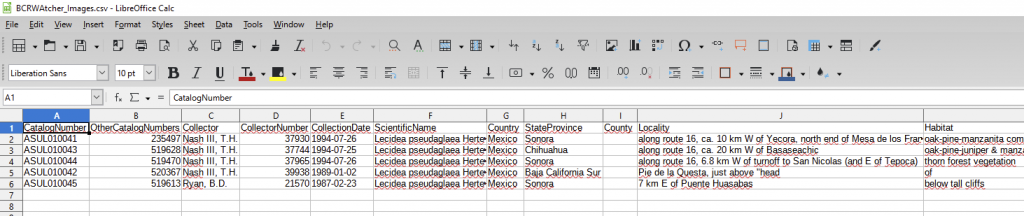
(III) You can also configure the program to write skeletal metadata into a CSV file and choose your preferred name for that file. The CSV written by BCRWatcher is a format ready to be uploaded as a Symbiota Skeletal Metadata File [via ‘My Profile – Occurrence Management Tab – Collection Management – Select “your collection” – in the Data Editor Control Panel choose “Add Skeletal Records”]. If you configure BCRWatcher to write a CSV, that CSV will be placed alongside your images into the ‘Destination Folder‘.
By uploading your Symbiota Skeletal Metadata File prior to uploading new images (i.e., files that previously lacked a database record), uploading the CSV will generate new skeletal records in bulk. Subsequently uploading your image files, these will then automatically be matched against the new skeletal occurrence records.
This is one option to capture the skeletal metadata already as part of your imaging workflow, instead of having to enter the data manually into the portal at a later stage.
(IV) Per default Symbiota Skeletal Metadata will also automatically be written into the image metadata of a JPG image itself. This has the advantage that the data embedded into your JPGs cannot get lost and the data can thus be accessed by any compatible software.
______________________________________________________________________________________
Some background on image metadata…
You might already be aware that taking an image with a digital device not only records pixel data, but also technical image metadata known as EXIF (e.g., the camera and lens you are using, ISO, aperture, shutter speed, flash, etc.).
If you are using image management software (like Adobe Lightroom), you will also know that, in addition to the technical read-only EXIF metadata, Adobe developed a metadata standard that can be used to read, write and thus modify custom metadata inside an image file in a format called XMP (for eXtensible Metadata Platform). This XMP metadata standard is now widely being used to store any non-technical or “customizable” information (like the creator of a photo, the copyright, image database tags, etc.). XMP has (almost) universally been adapted to capture custom metadata by a wide range of photo managing applications. It is a standard that allows custom metadata like the Symbiota Skeletal Metadata to be embedded directly into an image file itself.
However, although embedding XMP into image works well with processed image formats (JPGs, TIFFs, PNGs, etc.), modifying XMP metadata in camera raw files (e.g., Canon = *.CR2; Nikon = *.NEF; Sony = *.AWR) is not recommended. The only exception is Adobe’s own raw file format: DNGs can store XMP metadata safely.
For all other raw files, although technically possible to metadata embedded inside the file, this practice is strongly discouraged. Raw files are proprietary. Therefore, they are not well documented. And because of this poor documentation there is a high risk that embedding XMP inside those files may corrupt raw image data. Most software therefore will write XMP for raw files into a separate sidecar file, a text file with the extension *.xmp. You can open and view those text files with a simple text editor (see below).
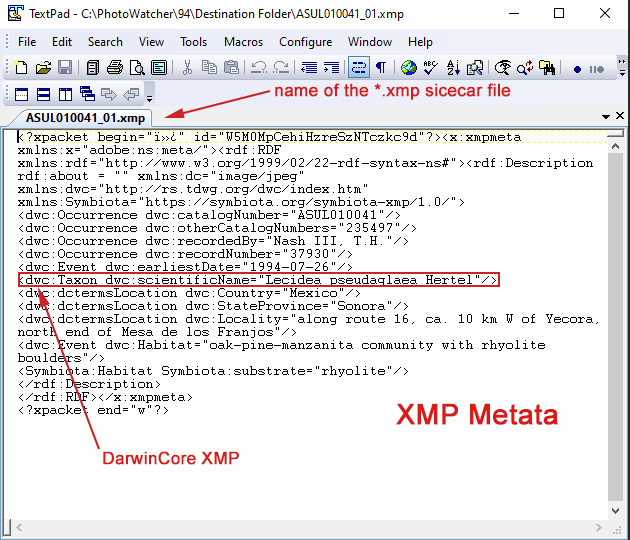
(V) BCRWatcher automatically stores XMP in all JPG files, but it can be configured to additionally write the metadata to a CSV and/or as an XMP sidecar. If you shoot JPG+RAW, it is strongly recommended that you enable the option to write XMP as a sidecar.
Some more background…
Currently, the only way to upload skeletal metadata to a Symbiota portal is via CSV. We are in the process of developing a Controlled Vocabulary to tag images with characteristic features (tagging for example whether an image shows a crustose lichen with lecideine apothecia, or a heavily pruinose foliose lichen with cilia, or….). These tags will be embedded into the images using XMP. The idea is to have Symbiota read those tags and ultimately match them against terms defined in its glossary and the character matrix used for identification keys. Once Symbiota is configured to read XMP, we anticipate that it will become obsolete to upload skeletal metadata files as CSV.
______________________________________________________________________________________
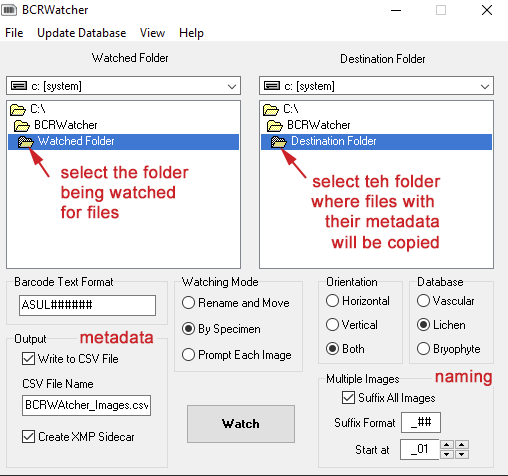
Configuration: “what to watch …“
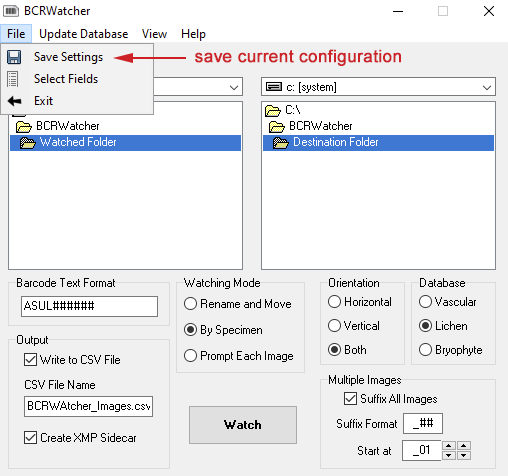
For the program to work, one of the first options that needs to be configured (apart from how metadata is written) are (1) the folder that the program scans for arrival of new image files, the ‘Watched Folder’, and (2) the destination directory, the ‘Destination Folder’ where images are copied into as part of the file renaming and metadata acquisition.
The program works in two ways:
(1) The ‘Watched Folder’ may already contain images. The program scans these images for barcodes and then suggests to rename them using the barcode as file name (JPG+RAW pairs will be considered different formats of the same image and thus treated as if they were a single file).
(2) The ‘Watched Folder’ contains no images, but a camera tethered to your computer drops all images into the ‘Watched Folder’ during image acquisition. As soon as a JPG arrives (or a JPG+RAW pair), BCRWatcher detects that file, scans it for a barcode and then suggests using the barcode as file name.
Multiple images with the same barcode …
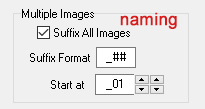
For multiple images with the same barcode, it is possible to have the program add a suffix. This ensure that files corresponding to the same barcode receive unique names. This suffix can either be numerical (i.e., one or several digits; use the wildcard # to represent a digit), or it can be alphabetical (i.e., a letter, use the wildcard @ to represent a letter suffix; letters are limited to characters of the alphabet from from ‘a’ to ‘z’; if you need more than 26, better use numbers). It is recommended to separate the barcode from its suffix by a hyphen, underscore, etc. (especially, if a numerical suffix is being used). Data entry for a suffix also allows to append a text string to the barcode. Say for example your image acquisition workflow for taking macrophotos of whole specimens, and microphotos of sections on a microscope slide is different. You want the filename to reflect this. Or you want to include as part of the file name that indicates whether the image is that of a label or of a specimen. Thus, instead of separating the suffix from the barcode by an underscore (or hyphen…) you can enter a text string as well, e.g.:
‘_microscope-section_##’ = for example: ‘ASUL010102_microscope-section_01.jpg’.
or
‘_label_@’ = for example: ‘ASUL010102_label_a.jpg’.
Finally, via ‘Start at’ the starting number (or letter) can be configured here too; typically you would want to start at ‘1’ or ‘a’, but there might be scenarios where your workflow was interrupted and you prefer starting the suffix counter again [this is usually not necessary, before the program renames a file with a suffix, it checks whether that number already exists in the destination folder].
Barcode Text Format & Barcode Orientation; selecting the Database …
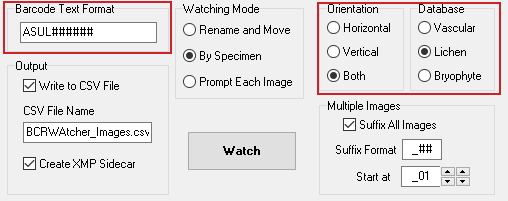
At almost any collection different barcode text formats are generally used. With or without letters, with or without symbols (hyphen, underscore, etc.), with a certain number of digits, with or without leading zeros. This text format must be configured before the program can detect any barcode in an image file [use wildcards (# for digits, @ for letters) in combination with or without the acronym to tell the program what format you use]. This text format is different from the barcode format itself. The type of barcodes that BCRWatcher can currently decipher are the two most commonly used barcode formats: code 32 and code 128.
Why is it necessary to specify a barcode text format?
It occasionally happens that the barcode text that a particular collection uses changes over time. At ASU the old barcodes being used are simply a number of six digits. We recently changed to a format that includes the acronym ASUL as a prefix. Barcodes text formats can also change, when one collection acquires and integrates another collection. BCRWatcher can distinguish between different text formats and if specimens bear two different barcodes, it will read only the one that meets the text format specified.
Orientation
In the image file, barcodes may be in horizontal or vertical orientation. The appropriate option should be chosen, unless this varies, in which case then program can be configured to scan an image both for horizontal and vertical barcodes. Horizontal scanning is much more rapid, vertical scanning needs more time; scanning both for horizontal and vertical barcodes might not be necessary and slows down the workflow.
______________________________________________________________________________________
Watching Modes
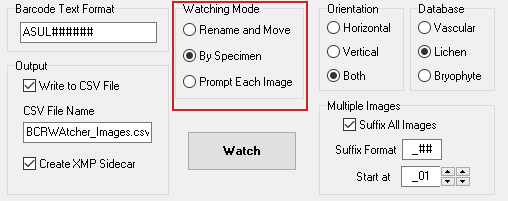
How and when are files renamed and copied to the ‘Destination Folder‘?
BCRWatcher supports three ‘Watching Modes’ for different image acquisition routines: ‘Rename and Move‘, ‘By Specimen‘, and ‘Prompt Each Image‘.
(I) ‘Rename and Move’
This is the most basic mode. An image will be scanned for a barcode, if a barcode is detected, the image will be renamed and moved to the destination folder, the program will NOT provide any option to enter skeletal metadata.
If writing to a CSV is enabled, the program will generate a CSV that only contains the barcode. If generating an XMP sidecar is enabled, that *.xmp file will only contain the catalog number (= barcode), no other skeletal metadata.
However, if no barcode can be detected by the program, an image preview with the option to enter a barcode manually will pop up to allow the user entering the barcode using the keyboard or a handheld barcode reader. Only when a barcode has been detected or entered into the catalog number field, will renaming and copying proceed.
A typical workflow scenario for using this mode:
Use this mode, if you do not need or want to capture skeletal metadata. You will then be using the program as a replacement for the old BarcodeRenamer (BCR.exe).
Why would you use BCRWatcher in ‘Rename and Move’ mode instead of BCR?
BCR works only on folders that contain images; it needs to be invoked in a separate step during the workflow, after image acquisition. BCRWatcher does the same “on the fly”, during image capture.
Also: BCR only renames files inside a folder, it does not copy files from a watched to a destination folder as part of the renaming routine.
And finally: only BCRWatcher writes metadata. Even in ‘Rename and Move’ mode it writes the catalog number (= barcode) into the metadata of the file (for JPGs), and/or the XMP sidecar file (for RAW files), and/or the CSV.
(II) ‘By Specimen’
This mode assumes that a series of images will be captured that all correspond to the exact same specimen, i.e., different photos of the same a specimen (the label, the specimen, an overview, a close-up, a macro photo, a photo of a microscope slide obtained from the specimen, etc.). The program will attempt to read the barcode only from the first image in the series. Afterwards, it assumes that all images in this series are uniquely identified by the same catalog number (= barcode).
Important:
Each time a series of images from a new, different specimen is shot, the ‘image watching‘ must be stopped and re-started – else the program will continue to rename the new files using the catalog number (= barcode) from the previous specimen and all metadata embedded in the file (and/or written to the CSV) will correspond to that previous specimen.
Metadata
In ‘By Specimen‘ mode the user has the option to not just have the program capture the barcode (= catalog number), but additionally, an image preview and metadata entry form allows for skeletal image metadata being added to all image files of the same series. For the first image in a series the image preview and metadata entry form will pop up, metadata can be entered; the same metadata as entered for the first image will be embedded into all JPGs, written to the CSV (if enabled), and to the XMP sidecar file (if enabled).
A typical workflow …
Documentation of lichen and bryophyte specimens typically require at least two images: (1) a photo of the packet with the label, and (2) the specimen inside that packet [unlike vascular plants mounted to a herbarium sheet, where label and specimens can be imaged together]. Also, for lichens and bryophytes a simple overview of a specimen might not be documenting sufficient detail of a specimen. Thus, a close-up of the specimen or even of a microscope section may needs to be documented by a series of images, all corresponding to the same specimen.
To avoid repeatedly entering the same metadata for one and the same specimen, use ‘By Specimen‘ mode. Also: in a series of images corresponding to the same specimen, only one image, the first one, will typically contain the barcode. In ‘By Specimen‘ mode BCRWatcher will not scan each single image for a new barcode but instead apply the same metadata to the whole images series, at least as long as the program is in ‘watching mode‘.
(III) ‘Prompt Each Image’
In this mode BCRWatcher will scan each single image file and prompt the user each time with an image preview and metadata entry form. Each time, that form pops up, the user can modify the metadata and, via check boxes in front of the metadata fields, decide to carry over some metadata from one image file to the next.
This works in two ways:
(1) If you use this mode to capture a series of images that correspond to the same specimen (with the same catalog number = barcode), it is not necessary to repeatedly fill in the same metadata fields. instead, if the program detects the same barcode from one image to the next all previous metadata entries will be carried over, no matter which check boxes have been marked. Unlike in ‘By Specimen‘ mode, however, the data entry form will still pop up each time for each image! If data metadata entries are modified, the CSV will be updated, but not the XMP.
(2) If the catalog numbers change from one image the next, i.e., if different specimens are being photographed, only the metadata entries marked by the check boxes will be carried over.
When would you use this mode?
In a workflow that typically captures one or only few images of a specimen, those photos mostly with a barcode and skeletal metadata should be captured, the ‘Prompt Each Specimen’ mode will be most useful.
It is also a useful mode for capturing images from a series of different specimens sharing most, but not all same skeletal metadata.
Example:
Say, a batch of specimen all from the same locality should be captured, all specimens have the same locality data, but different barcodes. Or all different specimens from one and the same exsiccata are being imaged. Or all images from one and the same collector, who collected at a particular site. Even for different specimens, the check boxes allow for carrying over information shared among different specimens.
______________________________________________________________________________________
Skeletal Metadata Entry
[PLEASE NOTE: Version 9 now supports additional metadata fields; chose the ones you need via File – Select Fields]
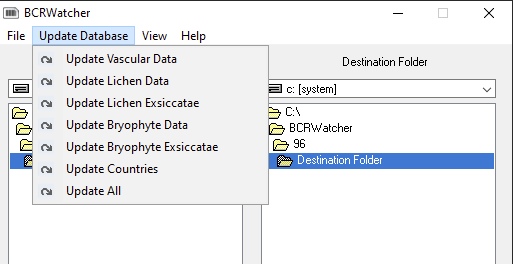
The data entry form of BCRWatcher uses an internal database to populate drop-down lists for the taxonomy (scientific names), the geography (Country, State/Province, and County), and Exsiccatae (Title Abbreviation & Identifier). This database can be updated via ‘UpdateDatabase’ from the program menu.

You can choose to update only the Taxonomy from the Lichen Consortium (‘Update Lichen Data‘), the Bryophyte Consortium (‘Update Bryophyte Data‘), or from SEINet (‘Update Vascular Plant Data‘). It is also possible to update the list(s) of Exsiccatae, either from the lichens (‘Update Lichen Exsiccati‘) or the bryophytes (‘Update Bryophyte Exsiccatae‘), or only the Geography (‘Update Countries‘).
Skeletal Metadata Fields
Currently the following fields are available (now updated in Version 0.9.0.2):
Catalog Number (= barcode; DwC XMP catalogNumber):
This field cannot be disabled, during image acquisition a catalog number will either be populated automatically (when BCRWatcher detects a barcode in an image) OR that catalog number must be entered manually (via keyboard or barcode scanner). The program will not work without that field and the carry-over checkbox will always be disabled [in ‘Rename and Move’ mode the program will only ask for a barcode when it is not able to read it from the image file; in ‘By Specimen’ mode that number will always be carried over to the same series of images until ‘stop watching’ interrupts the process of copying, renaming and adding metadata to the file; in ‘Prompt Each Image’ mode carry-over of manually entered barcodes is not possible].
Collector (DwC XMP recordedBy), CollectorNumber (DWC XMP recordNumber), CollectionDate (DWC XMP eventDate):
In many instances the combination of the collector and collector number uniquely identify a particular specimen. In Symbiota the two fields in combination with the collection data are used for duplicate matching. Skeletal occurrence records may benefit from duplicate matching to quickly populate other fields.
When uploading a skeletal CSV metadata file to create new records it is therefore recommended to include these three fields. [Note that only full dates can be entered ‘CollectionDate ‘ (using a calendar widget – click on months or years to quickly navigate); there is no Verbatim Date field.]
Collector and Collector number are also useful to match an image to an occurrence record for which a catalog number (= barcode) might not (yet) have been assigned. One possible workflow might be adding barcodes to specimens as part of the imaging routine and use Collector+CollectorNumber to match that specimen against an occurrence record during image upload. For this to work, Symbiota would need to be able to use the duplicate matching algorithm during image upload.
Although XMP is currently not read during image upload, in future versions it might be possible to use this info to better match images to records online.
Country (DWC XMP country), StateProvince (DWC XMP countryProvince), County (Symbiota XMP county):
These skeletal metadata fields can be useful to generate occurrence records in batch for specimens collected in the same place. This is helpful, if you organize image acquisition according to Geography.
Locality (DWC XMP locality), Habitat (DWC XMP habitat), Substrate (Symbiota XMP substrate):
As part of your routine workflow, you may decide to capture these fields as well, but they are typically less relevant and particularly entering detailed locality or habitat descriptions may be cumbersome.
ExsiccataeAbbr (Symbiota XMP), ExsiccataeID (Symbiota XMP), ExsiccataeNumb (Symbiota XMP):
Choosing custom fields for your skeletal metadata you can only select these three fields together. The ExsiccataeID is a unique number that cannot be entered manually during image acquisition. Instead the user chooses the Exsiccatae Abbreviation and the ExsiccataeID is populated automatically.
You have to choose the correct database and you must have downloaded the data from the lichen or bryophyte consortium, before the dropdown list for the Exsiccatae Abbreviation field will work.
Additional Fields (now supported in Version 0.9.0.2):
IdentifiedBy, DateIdentified: Now you can add who identified a specimen and when.
TypeStatus: Enter if the specimen of which you take a picture is a type.
VerbatimCoordinates: Here you can enter the coordinates in Degree, Minutes, Seconds – please note that natively Symbiota supports entering coordinate data in decimal format, but this field is useful, when coordinates are available only in a different format; Symbiota can automatically convert data if entered as XX°YY’ZZ.Z”N/S, XX°YY’ZZ.Z”E/W (e.g.: 33° 24′ 2.088″N, 111° 56′ 58.812″W).
DecimalLatitude, DecimalLongitude, MinimumElevationInMeters: These are the standard fields used for coordinate data used by Symbiota (and the Darwin Core).
Please Note: all Coordinate data are written to the Symbiota XMP namespace, not to the EXIF data of the files. This means images are not recognized as being geo-tagged by most software. If you want to make sure images are geotagged, you will need to use software to copy over these coordinates from XMP to the EXIF data of the file(s).
OccurrenceRemarks: Another Darwin Core field to add a comment about where a specimen has been collected.
ProcessingStatus: A field used exclusively by Symbiota, which can be useful to organize your workflow. Currently, the following entries are recognized by Symbiota: “Unprocessed, Unprocesssed/NLP, Stage 1, Stage 2, Stage 3, Pending Review, Pending Review -nfn, Expert Required, Reviewed, Closed”. Workflows are different and the collection manager / curator can chose how to use these categories.
RecordEnteredBy: The person who entered the occurrence record (= specimen data); not necessarily the same as the person who took the photo (the field ImageCreator is currently not supported, when uploading images with their skeletal metadata CSV file).
Whenever changing your selection of fields, don’t forget to save via File – Save Settings.
IMPORTANT: Only metadata fields that you select will be written to the images as XMP (either directly into the JPG file, or as an XMP sidecar to a raw file); all other fields will be ignored (= no empty fields will be written). If for the Output you chose to configure the program to create a CSV, only the fields selected here will be used to generate the skeletal metadata CSV file.
______________________________________________________________________________________
Updating the Database (of BCRWatcher):
The program stores entries like the names of species (Vascular Plants, Bryophytes, Lichens) Geographical Data (a list of Countries, State/Provinces, COunties), and Exsiccatae in a local SQLite database. Before using any selection of fields for the first time, you might want to update the database from the Consortium:
______________________________________________________________________________________
That’s it.
We very much appreciate you trying out how to incorporate the program into your workflow and let us know how well this works. Please report back any errors, ideally sending us the BarcodeWatcher.log for troubleshooting.
THANKS !!!
______________________________________________________________________________________
Disclaimer (beta version)
We have tested BCRWatcher with ControlMyNikon v5.5 and the Canon EOS Utility. If you use different software like Smart Shooter 4 or Nikon’s Camera Control Pro 2, it may be necessary to modify the program – it is possibly that BCRWatcher works with all kind of tethering software, but we haven’t tested those products yet.
Daryl and I have spent a lot of our time in the past few weeks testing and improving the program, but it is important to emphasize that this is still a beta version. We had a limited amount of computers for testing it out and also only a few different tethering programs and cameras.
Now it is time to get some feedback from you. Please try it out and please complain if anything is not working as expected. I am sure we will still need some more troubleshooting before distributing it to a wider GLOBAL TCN audience.
But, if we all get this to work well and reasonably stable on many different PC imaging workstations, it may be a fantastic resource for everyone.
One final note: the program unfortunately runs on Windows only. No Linux or MAC version is currently planned
thank you for testing …
Please send all feedback directly to me (always copying Daryl …).
Daryl Lafferty daryl[a]daryllafferty.com
Frank Bungartz frank.bungartz[a]asu.edu
______________________________________________________________________________________
